Computational Thinking in Brazil

I’ve been fairly quiet recently, but at least I have a decent excuse.

Way back in November, I was asked to help write a computational thinking scheme of work for some Canadian schools called Maple Bear – confusingly, I was told that the scheme would be deployed in Brazil, but I had great fun working with David Wall on 16 simple activities to promote computational thinking and computer science. David had seen me on Twitter and wanted to work with me and I really enjoyed writing the lesson plans with him.

Fast forward to May this year and David sent me another email to see if I’d be able to travel to Brazil for two weeks of training with Maple Bear. Every year the Brazilian teachers are invited to Central training in July and January (winter and summer break) to learn pedagogical skills for maths, English and science as well as school leadership training and they’d decided that this year they wanted to include computational thinking as one of their core training sessions. David had done a two-day session in the summer (January) with some specially selected participants, but they wanted to open it up to the rest of the teachers for their winter training which meant that I was invited to São Paulo to help out.

logo-mb.jpg

Maple Bear is a really interesting school group – they follow the Canadian curriculum, but don’t have any schools in Canada. From what I could see, they pride themselves on having some of the best and most well-trained staff that they can and the teachers’ passion for their students came across clearly in my sessions. I think that the schools operate as a franchise around the world, but with the majority of them being in Brazil, where they have a reputation for being some of the best schools in the country. To us Brits, it may seem peculiar, but the Portuguese speaking pupils are taught exclusively in English until they reach the age of 7 when some of the teachers deliver their lessons in English, while others deliver in Portuguese. I have to admit to being really impressed with their commitment to delivering top-quality education.

Anyway, my training was planned to be two, two-day sessions in week one at the central training in São Paulo and then two, two-day sessions in individual Maple Bear schools, one in the city of Belo Horizonte, just north of Rio and one way-up in the north-west of Brazil in João Pessoa, a tropical beach-town where winter is characterised by hot weather and torrential rain.

Needless to say, heading out to teach these teachers about Computational Thinking really got me thinking about what we mean by it. I thought about those four key-words that just trip of any CS teachers tongue – Decomposition, Abstraction, Pattern Recognition, Algorithm.

medium.png
Image credit: BBC Bitesize

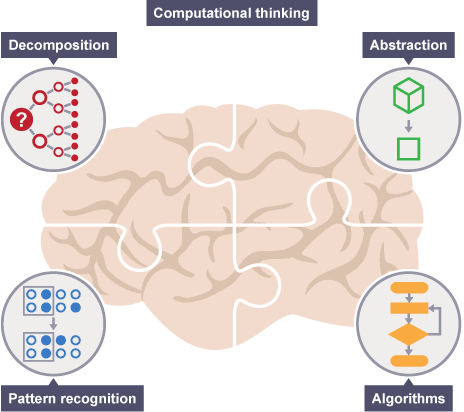
We call these the cornerstones of computational thinking, but how do we put into words what they actually mean? It’s actually quite difficult to get your head around how to explain abstraction, even when you know what it means, so introducing it to people that are completely unfamiliar with the terms can be quite difficult. For me, I learn best by example and so I immediately thought of activities and examples that would describe these skills, for example, tidying your room is an overwhelming task, but folding your clothes is much less intimidating, or planning to revise for examples over the summer can see terrifying until you break it down into a revision timetable and plan carefully what topic to revise and when.

One of my favourite activities during the training was one I found on code.org – ask the group to add up the numbers 1 to 200 in their heads as quickly as possible, put pressure on them and make them feel stressed. Obviously no one is going to do it, especially if you only give them a few seconds to think about it. Now ask the attendees/students whether anyone actually tried it or whether people gave up – make it clear that it’s ok to have given up.

Now, explain that we are going to decompose the problem by breaking it down a bit. You need to write on the board:

1 + 2 + 3 + .... + 198 + 199 + 200

The next thing we want our users to do is to recognise any patterns in the sum we’ve written up – someone will eventually point out that either you can add 200 + 1 to make 201 repeatedly, or you can add 199 + 1 to make 200 repeatedly.

Now we use abstraction to calculate how many times we’ll need to repeat the sum – depending on whether you’re using 200 or 201, you either need to repeat it 100 times or repeat it 100 times and add 100 one at the end – either way you get 20100 and you’re able to write an algorithm for your sum.

20046576_10158967673480024_1061293103771818250_n

What you’ve done is apply computational thinking to a fairly complex sum in order to calculate it quickly and understand that actually, adding all of the numbers up to 200 is pretty easy.

In fact, on the final set of training in João Pessoa, I started thinking about how you could make the problem more complex and it occurred to me that you could apply the exact same method to adding all of the numbers up to 400, which would then give you the sum 401 x 200, or all of the numbers up to 600 (601 x 300). As you can see, my maths brain got really excited by the application of this puzzle.

For the first day of the training, I wanted to separate the ideas of computer science from computational thinking and so we focused on unplugged computing; I spent weeks searching through the excellent resources on CS Unplugged and Barefoot Computing as well as using the ideas we’d written into our scheme of work. I wanted to focus the training on the teachers having fun as I know that from my experience of Picademy, I was much more enthusiastic about applying what I’d learnt because I’d had time to try it out and play with it myself.

In the second half of the first day, I had planned on demonstrating how you can apply computational thinking to a music lesson by asking students to compose a piece of music and then write a pictorial algorithm for playing it back. As it happened, I’d seen some street performers in São Paulo that really impressed me by playing incredible sounds just using every day objects like bottles and pipes so and so I used this as inspiration for the teachers on the course and asked them to use items in the classroom to create pieces of music.

At each of the four sessions, I was continuously amazed with the musical talent of the teachers, but what I liked even more was how much fun they were clearly all having. It felt like a mask dropping down as the teachers realised that it was ok to relax and enjoy the activity.

At the end of the first day, I was really pleased to be able to talk about some of the people who inspire me and I ended up with three whole pages full of inspiring people from Carrie Anne Philbin to Cerys Lock! I also talked about great software and hardware like Code Club and Raspberry Pi. Check out my slides from the session here.

On the second day of training, the focus was more on software, I spent the morning introducing the teachers to Scratch and the afternoon looking at Active Lit and the amazing Sonic Pi – once again, I focused on keeping the training as fun and as interactive as possible and I love the fact that every single time I introduced Scratch, it was hard work trying to convince the teachers to go on their coffee break because they were having too much fun!! Interestingly, in all four of my sessions, only around 5 teachers in total had ever used Scratch so for most attendees, it was completely new.

I had such an amazing time meeting a diverse range of people in Brazil and I’m grateful to Maple Bear for inviting me over – I hope I get to go back as I was so impressed with how well all of the people on the training absorbed information and demonstrated eagerness to use what they learnt in their schools. I’d be really keen to hear about what lessons they have taught using unplugged suggestions or else introducing Scratch, Sonic Pi or Active Lit. I loved that each teacher seemed to take something different away with them, with some immediately planning unplugged activities, while others were thinking carefully about how to integrate Scratch into their lessons.

IMG_2067.JPG

One of the things that really stood out for me whilst doing this training is that most teachers naturally understand computational thinking, in fact, when you think about the day to day life of a teacher, we are using CT skills on a daily basis without even recognising it. This can be a bit of a trap because we may find ourselves thinkings “oh but I do that already” because the point is that we’re all good teachers because we use computational thinking without thinking. It is a skill that we have developed to become successful, but that doesn’t mean that our students know how to use it; it’s time that we made those implicit skills that make us good teachers explicit for our students’ benefit. We need to make it clear how to use decomposition to make a problem easier to solve or pattern recognition in order to spot how to predict outcomes. We need to make sure that children aren’t growing up with the resilience and toolkit needed to solve the most basic problems.

Our students are not mindless machines, they need to be guided and shown how to help themselves – we can no longer just learn by rote because, as we often quote (or misquote) Richard Riley, the former US director of Education “Education should prepare young people for jobs that do not yet exist, using technology that has not yet been invented, to solve problems of which we are not yet aware”.  How can we confidently prepare our learners for both jobs and technology that does not exist – it’s simple, we can’t, but what we can do is prepare them to be able to cope and to develop the critical thinking skills to manage when a situation is new or unfamiliar. As teachers, we must understand that we are no longer omnipotent and all knowing, there will be pupils, even in the primary school classroom, who know more than we do and that’s ok, because what we do know is how to guide and nurture those students to achieve and become the best that they can… and who knows, maybe one of those pupils will be the one who discovers a cure for cancer, or invents a flying car. Isn’t it nice to know that we were part of that journey?

Travelling to Brazil was an amazing experience and, as a country without any computer science curriculum, I felt honoured to be able to introduce a vision of computer science and computational thinking to around 75 teachers over the course of two weeks; I hope I get to back. Talking to all of the teachers that I met in Brazil really reminded me of why I’m doing all of this and why I love computer science as much as I do. I feel clearer in my own mind about what this journey means to me and what an impact we can make on teachers and students by simply talking about computer science and computational thinking. Thank you Maple Bear for giving me such a wonderful opportunity.

Google AIY…

Ok, before I get started, I wanted to offer a huge thank you to Jamie at The Pi Hut for sorting me out with a copy of the MagPi with the AIY kit. You are a star!

Back in May, the Internet exploded with the news that the MagPi magazine was offering a free Google AIY kit to use with Raspberry Pi. Copies sold out in minutes and people hunted across branches of WHSmiths to try and get their hand on one. Shops got new stock that sold out instantly.

The concept? Google, working with Raspberry Pi, have created a simple voice-interaction module so that you can use your Pi like an Amazon Alexa (but powered by Google).

Naturally, the makersphere exploded with excitement and projects began surfacing across the Internet. Copies of the MagPi were selling on eBay for extortionate prices and people were chattering about what they would create.

I’ve had my copy of the Magpi for a few months, but I wanted to wait until my friend Kirk was visiting as I knew he’d enjoy himself helping us with the making.

IMG_2119.JPG

We pulled the kit out of the box, and being the methodical cool kid that I am, I quickly checked the components against the kit I had. This is where we hit the first hurdle – according to the instructions, we had a ’40-pin header’ that was pre-soldered, but the picture showed the 40 single pins that most definitely weren’t pre-soldered. To further add to the confusion, all of the photos of the accessory board within the tutorial appeared to show the 40 single pins soldered on to the board, but the first line of instructions stated that no soldering was necessary – so which was it? Did we need to solder or not?

Further exploration and a brief skim of the instructions made us realise that we didn’t actually need to solder the extra pins on, but we were pretty confused for a while there. Why show them soldered on if we don’t need them!?

Kirk decided to boot up a pi and start writing the code and it was at this point that we realised that we need a special version of OS. Stuart got pretty grumpy at this point because he only knew how to flash SD cards using a command line and he claimed the image file could only be read using a Linux machine – fortunately, I explained about Etcher and we were back on track.IMG_2127.JPG

Before we got any further, we decided to stop for dinner – it had been an hour already and all we’d managed to do was flash an image and get confused about the components.

IMG_2128.JPG

After dinner, Kirk checked the SD card – success!

We knew we had the right image when the AIY background popped up so Kirk made a start on setting up the AIY API (supposedly the hardest part of the task).

This is where we hit on yet another issue – the new OS image was convinced that we were time travellers and that it was actually January 2018 – Kirk spent quite a bit of time fighting with the date and even tried to just ignore it, but Chrome clearly had other ideas.

I’m not sure what Kirk did, but he managed to get it working eventually, however, the pi was renamed as ‘TimePi’ to represent it’s time-travelling capabilities.

While Kirk got on with the software, I was in charge of building the hardware, while Stuart caused problems by putting things together ahead of the instructions! (Kirk also decided that we need to have a paintbrush in all pictures…each to their own).

IMG_2141

The next instruction that made Stuart cross involved using Scotch tape to hold the microphone in place – firstly the microphone didn’t sit flush unless you really rammed it into the cardboard and secondly, Scotch tape did not stick to the cardboard properly and so I had to go and find some masking tape instead.

Meanwhile, Kirk had successfully managed to set up the Google AIY API so that it worked with one of my Gmail accounts – both boys said it was surprisingly easy, considering this was the part that people had warned me about going wrong. Having said that, both Kirk and Stuart are hugely experienced using Google products so they didn’t use the instructions particularly, it was something they already knew how to do.

Kirk wanted me to point out that he found the software set up quite confusing as there were instructions in the magazine as well as completely different instructions online, but he managed to get everything working eventually and when i came in from loading up the dishwasher, the two boys were arguing over whether they were on instruction 9 or 12 depending on whether they were using the online instructions or the magazine instructions.

At this point I realised that there was absolutely no way that I would have been able to get the software side working without the boys and I became confident that this was not a beginners’ project.

I took this opportunity to make some cocktails, while Stuart got excited about there being a slot in the cardboard to easily add the SD card… simple things 😉

We got the light to turn on, but hit on some problems

IMG_2153.JPG

Stuart dialled in using SSH and we realised that the speaker wasn’t working – on closer inspection, one of the cables that I had previously screwed in had come loose and so we had to pull it apart to refit the cable – personally, I think Stuart knocked it out when he was putting things together in the wrong order, but he claims it was my shoddy building skills!

So, we got the AIY working but were slightly disappointed

Without another add on, we weren’t able to ask the AIY to play music – in fact, it didn’t seem to do much, but the boys got excited and started trying to find out what to do next.IMG_2157.JPG

A bit of hunting and I found a great post on the Raspberry Pi forum which explained how to get the AIY to interact with YouTube. Thanks for posting MikeRR

IMG_2155.PNG

It took a while, but Stuart and Kirk were successful and managed to get techno music playing…

The next step was that Stuart wanted to get Radio 6 music playing through the AIY…Things did not quite go as planned, with the AIY mis-hearing Stuart’s instructions a little bit…

IMG_2499

At this point, I was completely oblivious as to what the boys were doing, which once again affirmed that this wasn’t really a project for me, but rather it was better suited to makers and people with greater understanding of both software and hardware. At least they were having fun.

So, in conclusion, I’m not convinced this Raspberry Pi project is one for schools, but in defence of the MagPi, it was never advertised as an educational project, it’s definitely one that’s more for the makers than the educators. The instructions could have done with a bit of polishing, but I suspect most makers wouldn’t have got as confused as I did by something as simple as a pre-soldered header. Basically, this particularly piece was a bit beyond my ability, but the boys had fun, particularly when they got beyond the most basic stage – it was around 11pm when I eventually kicked Kirk out so they must’ve been really enjoying themselves.

The thing is… now what? We have a built AIY unit, but what do we do with it now, other then get it to play Techno Music…

Pimoroni Mood lamp

I bought the Pimoroni Mood Lamp kit way back in March at the Raspberry Pi Birthday Party, but I held off building it until Louise could come around, especially as I was nervous about soldering all of those pins onto the Pi Zero so I thought it would be a nice project for us to do together. You may remember that last year Louise and I built the CamJam 3 robot kit together; she is a talented artist and pub landlady with absolutely no background in computer science and no knowledge about how any of this stuff works, so she’s a great person to try things out with.

Screen Shot 2017-05-19 at 23.04.26.png

So for those of you who aren’t familiar with the Pi Zero, it’s an even more tiny and cheap Raspberry Pi and it doesn’t come with GPIO pins already in place so you have to solder them on if you want to use them. Scary stuff for a novice solderer like me! In February, in time for the 5th birthday, Raspberry Pi announced the Pi Zero W which adds Bluetooth and WiFi to an already tiny and affordable device. The Mood Lamp was one of three kits that were released by Pimoroni at the launch of the Zero W. You can also get your hand on Pirate Radio, Scroll Bot and, as of a couple of weeks ago, the OctoCam – find them here.

So… on to the soldering. We started off watching the new soldering video which the Raspberry Pi Foundation brought out recently starring the lovely Laura Sach. I found Laura’s video to be really useful and interesting, but we also listened to the advice of soldering guru Stuart. As he pointed out to us, he’s been setting fire to carpets since he was 9 years old and so is experienced at soldering.

I had prepared for disaster and got a spare Pi Zero W and a hammer header in case the soldering went horribly wrong – thank you to both ModMyPi and Pimoroni for donating the spares (not that the former had much choice, they foolishly didn’t believe me when I said that the circumference of a pint glass was longer than it’s height and agreed to give me a Pi Zero W if I proved them wrong)… but I digress. The hammer header allows you to add pins to the Pi Zero W by tapping them in place using a hammer, so an excellent option as a back-up plan.

Stuart decided to solder five pins to start us off and hold it in place and then left us to it. He explained that it was important to make sure that we were heating the pin and the Zero and applying the solder to that and not the soldering iron. We had a go at a few pins, but Stuart wasn’t happy and told me to make sure I wasn’t just dabbing solder on the iron and letting in roll down. By the time the pair of us finished, we were pretty happy, but Stuart took a careful look and said that some of our joins didn’t have enough solder and so weren’t properly connected… and to think I was worried that I’d put too much solder on some of them. All told, we were there for around fifteen minutes, but it felt like much longer.

We were pretty pleased with ourselves when we’d finished so we sat down and got the kit out to try and figure out all of the parts… We had a bit of fun peeling off the plastic from the acrylic and laid all the bits out, but then we realised that we had still more soldering to do – the Unicorn Phat needed soldering too!!

Back to the kitchen we went, Louise decided to leave me to it and apparently I hit my soldering mojo and got the entire header soldered in a few minutes!

So, all soldered up, we were ready to go – I was quite interested to see the difference between the soldering on the zero compared to on the Unicorn Phat – I’d clearly improved by the second time!

IMG_1452

IMG_1455

Louise was confused by the how the pieces went together, but we quickly found the tutorial and before we knew it, it was all built and looking pretty, including our soldered Pi Zero W and Unicorn Phat header.

Thank goodness for Stuart’s ridiculous amount of tools, as we were able to clip off the excess bolt length on the Pi Zero W mount.

IMG_1459.JPG

So, now we’d built our Mood Lamp, it was time to run the code – I put a Raspbian SD card into my pi-top, transferred the Unicorn pHat to test it. We followed the instructions on the Pimoroni GitHub for the Unicorn pHat to download and install the relevant library and examples. I figured random_sparkles.py was probably a good place to start, but when I ran it through Python 3, nothing happened. Stuart to the rescue… he opened Terminal and used the command

cd /home/pi/Pimoroni/unicornhat/examples

To access the directory and then used

sudo  ./random_sparkles.py

to get the code running – this frustrated me a little bit as I wouldn’t really have known to do that without his help. I know to run code through Idle, but I wouldn’t think to use Terminal and sudo without him telling me to – especially ./ which I’ve never seen before.

Next step was to get the code to run on start up – again I had a few problems with that, I followed this great guide from Les Pounder, but managed to accidentally leave the last line of the code as a comment with a # at the beginning – a little frustrating, but entirely my fault. We also discovered that again we need to use ‘sudo’ to get the code to run on start up, this time within the crontab settings (whatever that might mean).

So, we got the random sparkles up and running on start up and decided to transfer the SD card and Unicorn pHat into the Pi Zero W and get the mood lamp up and running. Unfortunately, we had no luck and I began to worry that I’d soldered everything wrong. Stuart sat and used VNC to check the pi was working and as far as we could see, everything was running as it should, but no random sparkles. Stuart decided to pull the Pi Zero out completely to check nothing had come loose and this point he threw his hands in disgust and gave it to me… it seems when I’d put the pHat back on the Pi, I’d not mounted it in the right place, it was just on the front row of pins and not on all 40 pins! What a wally!

I have to admit to finding this a little more stressful than I’d hoped, especially with the whole ‘sudo’ thing, and I have absolutely no idea where to start with connecting it to Twitter, but I’m glad I’ve got it built and it does look kind of cool. I think I’d like to use one of the other samples as the random_sparkles was a bit too quick for my liking, but that means going back into Crontab and putting all the bits back into the pi-top and I’m not sure I have the energy for that right now!

So, it’s an easy to put together kit, I just don’t feel like I’m quite confident enough with running code on start up or what to do when things don’t work first time!

At least Louise and I can both say that we know how to solder now, anyway!

An Easter gift – RPi beginner’s worksheet

[edit] As of June 2017, there is a version of Scratch 2.0 on Raspbian which makes this worksheet obsolete [/edit]

I’ve been running a few workshops for Crossover Solutions and have created some Raspberry Pi Physical Computing resources that seem to go down well with both children and adults and so, as a little Easter gift to you all, I’ve decided to share the worksheets.

There are four in total – ‘Your First Circuit’ ‘Scratch’ ‘Python’  and ‘Next Steps’, all designed to be an introduction to physical computing. My experience has been that pupils will get three LEDs blinking in Python within an hour – I’m sure you could do it quicker, but it’s really important to discuss with the pupils what they’re doing at each stage and why so I tend to take my time to ensure that conversation happens, particularly since this can be used as a transition from Scratch to Python as well as an introduction to electronics.

As always, huge thanks to the Raspberry Pi Foundation for the inspiration to produce resources like this, as well as their never ending support.

Get in touch if you’d prefer an editable version and I will send it over to you, otherwise click on the link below for a pdf.Screen Shot 2017-04-16 at 11.22.24.png

link: Workshop – crossover

Creative Commons Licence
Crossover Workshop by Cat Lamin is licensed under a Creative Commons Attribution-NonCommercial-ShareAlike 4.0 International License.

Trying out the Micro:bit

It’s taken me far too long, but I’ve finally got my hands on a Micro:bit! I often get asked about these little micro-controllers and whether they are useful to have in the classroom so I’m looking forward to testing them out. Thank you very much to Nic Hughes for the loan!

The first thing to say about the Micro:bit is that unlike a Raspberry Pi, it’s not a computer; it’s a micro-controller like an Arduino, which needs to be plugged into a computer to have code uploaded to it. In contrast, a Raspberry Pi is a computer which does not need to be connected to anything else to work. This means that the Micro:bit is slightly more limited than a Pi, but it’s still a cool device.

So, let’s take a look at the physical hardware. The Micro:bit has a number of exciting features, not least of which are a host of components, which are clearly labelled on the back of the device – in particular, a compass, accelerometer and BLE antenna. I really like how clearly everything is labelled on the back for the device, this can be a great teaching point – what do we think each of those things do? How can we integrate them into our code?

The front of the device has 25 red LEDs in a 5×5 array. There are also two programmable buttons, 3 hardware pins, a 3V pin and a ground pin which can be used for add ons like NeoPixels or a growing range of Micro:bit boards designed to fit onto the Micro:bit like HATs on a Raspberry Pi.

In order to use the Micro:bit, you’ll need to head to the Micro:bit website. I suspect that there is an offline version of the various code editors, but for now I’ll work on the assumption that I need to work online. I know you can download Mu (pronounced moo because the creators liked the idea of ‘teachers saying moo in class’), which is a micro-python code editor for the Micro:bit, but I’m not sure about the other code editors.

Given my primary background, I will focus on block-based coding for now, but I can always follow up with a look at micro-python in a few days.

I love that there seems to be a wealth of activities on the website, including a special ‘Mother’s Day Challenge’ (For Americans and other non-UK people, Mother’s day in the UK falls in the middle of lent, which is usually in March, rather than mid-May).

Screen Shot 2017-03-07 at 09.50.58.png

For now, I’m going to be looking at the ‘Let’s Code’ section of the website.

Screen Shot 2017-03-07 at 09.54.00.png

When I first looked at the site a few weeks ago, the JavaScript Blocks editor was still in Beta, but Nic was very firm that we should be using it over the previous blocks editor made by Microsoft. I’ve also seen a tweet today showing that python-blocks is in development, although still only in Alpha at the moment. I can’t wait to see what it looks like!

Screen Shot 2017-03-07 at 09.58.43.png

It’s worth taking a look at the projects page for some ideas about where to start with the Micro:bit and there are a few teachers coming up with schemes of work that use it (I suggest getting in touch with Spencer Organ who has written an entire scheme of work around Harry Potter).

Screen Shot 2017-03-07 at 10.00.44

Since I’ve had so much fun making animated pets on the Pi lately, I figured an obvious start point for me would be to do something similar on the Micro:bit. Interestingly, when I went into the code window, it had remembered the piece of work I did several weeks ago when Nic first showed me the Micro:bit, which saved me having to hunt around and figure out the code!

So here’s how the screen looks – it has a nice familiar feel to it since it’s based on Blockly and is therefore very much like Scratch. The blocks are nicely colour coded depending on what you want them to do. I’m particularly curious about the ‘radio’ and ‘music’ options – I think you can allow Micro:bits to talk to each other, but I could be wrong – definitely something I’d like to investigate further.

Screen Shot 2017-03-07 at 10.06.50.png

Here’s a closer look at the code I’ve written – the ‘pet’ was a little harder to draw on 25 pixels so it looks a bit weird.

Screen Shot 2017-03-07 at 10.06.44.png

One frustrating thing about the Micro:bit is that you need to download the code and then manually drag and drop it into the Micro:bit although I’m told on a PC you can set the download location directly to the Micro:bit, still it’s a bit of a faff.

Screen Shot 2017-03-07 at 10.07.14.png

A really cool feature of the Micro:bit website is that you can test your code on the website – in the video below you can see that you can test the ‘shake’ feature both by clicking on the shake button or by manually ‘wiggling’ the device. I think it’s really important that we remind children to check their code regularly as it can be really hard to find an error in your code if you’ve written loads and not checked it.

In the second video, you can see the code running on the actual Micro:bit.

There seem to be lots of input options to use instead of ‘on shake’ and I’d be interested in giving them a go, although I’m not sure what they mean. There are also other options to drag in. Take a look below:

Another nice little feature of the blocks editor is that you can view your code in JavaScript. I look forward to this being possible for Python too, which looks like it’s in development based on Nicholas’ tweet mentioned above.

There are a few ‘advanced’ options I’d be keen to explore, as well as the ability to add in packages for add ons which seems intriguing. Hopefully I’ll have a chance to explore some more features soon.

So, what do I actually think about the Micro:bit?

I’m actually more impressed than I thought I would be, I was expecting to be underwhelmed and instead I had great fun playing with the Micro:bit. The website is fairly easy to use and has some lovely features. I look forward to seeing it develop further. I know there are teachers crying out for schemes of work relating to Micro:bit so perhaps that’s something that needs developing further and in my brief hunt around the site I didn’t see any obvious explanation of some of those features in the code editor, but I admit I wasn’t looking too hard.

If I had my way, I’d like to see teachers using Micro:bit with a Raspberry Pi to really emphasise the technology and make clear how unique and exciting digital making can be – check out this resource on using the Micro:bit with Pi. However, if you forced me to choose between Micro:bit and Pi, Pi would win every time, it’s just more versatile and has more opportunity to develop your skills.

Micro:bit is a great place to start on a journey towards digital making and at £12.50 (or £15 if you want a battery pack with it), it’s fairly affordable, but it is simply a start point and you can achieve so much more with Arduino and Pi – for schools it is a good way to introduce text-based languages and I am particularly looking forward to the new block-Python that is being developed. In the long term, however, I know what I’d rather see being used.


A busy few months

I know you guys love hearing about what I’m up to so here are a few fantastic events that I’ll be appearing it either running workshops or giving talks – it’d be great if you could come along and join in the fun!

Firstly, this weekend I’m taking the pi-top Champions to The National Museum of Computing and Bletchley Park museum for a weekend of training and fun – the most exciting thing about it is that on Sunday 19th the Champions will be running workshops in the National Museum of Computing, showing off exactly why we chose them – I’m so excited about this weekend and hope some of you can join and bring your kids along to what will be an incredible day of opportunities. Let us know you’re coming by signing up here!

tnmoc-logo_3

I’m really excited about the Champions day as I feel like we’re bringing together some of the best of the best when it comes to running workshops, training and all things Raspberry Pi – we’ve picked an amazing team of people for our Champions and I can’t wait to share further details with you all!

I’m looking forward to joining Nic Hughes at the London CAS conference on Saturday 25th February. Nic and I are working together with him leading a Crumble workshop and me leading a Physical Computing Raspberry Pi workshop. It’s always good fun working with Nic and we’re looking forward to inspiring some teachers to innovate their computer science classrooms.

Raspberry Pi is celebrating it’s 5th year at the Junction in Cambridge on 4th and 5th of March and I’ll be there both days and doing a talk on the importance of teaching children to code on Saturday 4th at 1.30. The birthday party is always a great fun community event and tickets can be bought here.

Throughout March and April, I’m running workshops through pi-top for a number of great charitable groups such as STEMSussex, BECSLink and London CLC which will be great fun and I’m hoping to be able to do something for International Women’s Day on 8th March.

</edit> I forgot to mention my own event – Coding Evening for Teachers, in Twickenham on Friday 24th March – tickets are here.</edit>

At the end of March, I’m VERY excited to be attending three incredible events – first up, the NAACE conference in Leicester (28th-29th March), where I’m running not one, but TWO break out sessions – one for pi-top and one talking about the amazing Active Lit as a tool for writing text adventures. Looking at the speaker list, I have a feeling this is going to be a very exciting event and it seems that the people at NAACE are really determined to make it a very successful couple of days.

Next up is PiWars in Cambridge – I’ve always been a big fan of Mike Horne and Tim Richardson, especially their really helpful CamJam EduKits for teaching physical computing with Raspberry Pi so I was incredibly honoured to be asked by them to be a judge at PiWars, an event so popular it’s had to extend to cover two days instead of just one! The blurb for the event describes it as:

logo-v2-rgb-sm

Pi Wars is a challenge-based robotics competition in which Raspberry Pi-controlled robots are created by teams and then compete in various non-destructive challenges to earn points. There are prizes awarded at the end of the day. Last year, we had teams from schools, families and groups of hobbyists and 30 of these teams competed for a full day of robot fun and games! Pi Wars takes place in Cambridge, UK and is open to anyone from around the world. It is run by the same team that organises the Cambridge Raspberry Jam.

How much fun does that sound? There are still spectator tickets available if you want to bring your children or even your class up to inspire them to create their own robots and one of the two days is dedicated entirely to schools and youth groups!

Following on the heels of PiWars is ATI 2017 in Malvern. Primarily an Apple event, this year ATI has extended to include some more general computer science skills, particularly Raspberry Pi and the lovely Joe Moretti asked me to suggest some workshops. I feel like a bit of an interloper seeing my name surrounded by some of the big names in Apple Education, but I’m really excited about offering some Physical computing and Minecraft hacking information for some teachers, most of whom will be completely new to Raspberry Pi and then entire Pi ecosystem. ATI looks like n exciting event and I know that the other presenters are all incredibly inspiring so I’m really glad to be part of the team – there are still tickets available and it’s worth going along just to meet people like Joe, Mark Anderson, Catherine Jessey and Jon Neale, all of whom I’ve seen present before and know are incredibly inspiring!

c4n_svmwaaa5kgf-jpg_large
Photo credit – Mark Anderson @ICTEvangelist/ATI event page

You’d think that’d be enough events, but no… in May, I’ve been invited by the STEM Centre in York to run a ‘Scratch Roadshow‘ taking sessions to Truro, Bristol, Swindon and Reading. This will be an intro to Scratch for primary school teachers who want to build their confidence a little – the best thing about it is that there is a bursary which makes the training completely free so it’s well worth letting your local primary school know if you think they could do with a boost!

Anyway, there are more events later in the year, but that will do for now! I hope you can come along to some of these events and please do come over and say hi – I love meeting you all ‘IRL’. And remember – if you can’t come to any of these events but are still interested in the type of training I can do, please drop me an email cat@crossover.solutions – I offer workshops and CPD training bespoke to your school or group’s needs!


Shakey Sense Hat Cat

[edit] As of June 2017, there is a version of Scratch 2.0 on Raspbian which makes this worksheet obsolete [/edit]

After Sunday’s coding session, I set the boys the task of making our Scratch Sense Hat Cat Shake, just like Carrie Anne’s Interactive Pixel Pet.

The first thing the boys did was to figure out how to use some of the sensors on the SenseHat – remember how in my other post, I said it was good practice to run the basic broadcast command before you do anything.

screen-shot-2017-02-12-at-19-33-46

We had found some code from Albert’s GitHub page, however, when we tried to select the sensor value for accelerometer, we only had a few choices as shown below.

screen-shot-2017-02-14-at-12-40-30

screen-shot-2017-02-14-at-12-35-53

Luckily, after trying a few things, I suggested that we hit the green flag to check that the GPIO pins were on and that Scratch knew we had a SenseHat attached. When we next checked the sensing options a while heap of new options appeared, including the accelerometer (sorry, I forgot to screenshot it).

The boys had great fun playing with the sensors, but couldn’t quite figure out how to get the ‘shake’ function working so they went back to the original code for Interactive Pixel Pet.

x, y, z = sense.get_accelerometer_raw().values()

while x<2 and y<2 and z<2:      
    x, y, z = sense.get_accelerometer_raw().values()

This is what they come up with:

screen-shot-2017-02-14-at-12-49-01

A job well done, if I do say so!

Now, I’m sure some of you have spotted that I could neaten up my code by removing the ‘ledbackground’ line and that ‘clearleds’ would be better suited to the end of the repeat loop as that would leave me with a completely blank neopixel array at the end of the animation sequence, but otherwise I’m pleased with our work in recreating the pixel pet for Scratch.

I look forward to trying out some of the other sensors using Scratch in the future!


Sense Hat Cat using Scratch

[edit] As of June 2017, there is a version of Scratch 2.0 on Raspbian which makes this worksheet obsolete [/edit]

So, I absolutely LOVE the Interactive Pixel Pet activity from the Raspberry Pi website, and while I was playing with the Sense Hat the other day, I realised it was possible to imitate it using Scratch. So far I’ve only got it running as an animation, so next step is to get the shake function working as we’ve just figured out how easy it is to use the other sensors on the hat using Scratch.

I had a play and managed to get a very cool dancing cat on my LED matrix – I’m not going to lie, I was super excited and may have run around showing everyone in a slightly excited manner. Fortunately, my colleagues were also excited, although their contributions of dancing ‘poo emojis’ weren’t quite what I had in mind.

screen-shot-2017-02-12-at-19-33-04

Here’s a bit of background on the Sense Hat… for those of you who don’t already know, the Sense Hat was created by the Raspberry Pi Foundation and launched as Astro Pi – a competition to get your pupils’ code into space. It has an 8×8 neopixel array, a mini joystick and a load of amazing sensors like humidity, pressure, gyroscope and accelerometer.

So, the first thing you always need to remember when using Scratch GPIO is that you have to turn on the GPIO server on and, if you’re using a hat, you’ll need to let it know which hat it is by using the command “set AddOn to”.

screen-shot-2017-02-12-at-19-33-46

This is pretty important for anything using the SenseHat and it’s good practice to run it before you go any further in your code as by running it, Scratch will realise you have access to all of the sensors on the hat and allow you to access them through the drop down menu in the blue ‘sensor value’ block.

Firstly you will need to delete the Scratch Cat so that you can draw you own sprite.

screen-shot-2017-02-12-at-19-34-06

In the paint editor, you need to zoom right in as far as you can and select the smallest brush size.

screen-shot-2017-02-12-at-19-34-36

You have four squares in total to draw your image – I’ve shown this here by making the area black (you don’t need to do this, but it can help as ‘black’ represents the neopixel being turned off).

screen-shot-2017-02-12-at-19-35-16

Now you can draw your image – you have exactly 64 pixels to draw with and, as you may have guessed, one pixel on the screen represents one neopixel on the sense hat. By the way, a neopixel is a very bright LED which can be any colour depending on the mix of red green and blue. The lighter your colour, the brighter it will appear on your neopixels so try to avoid dark browns and blues etc.

screen-shot-2017-02-12-at-19-35-42

Next you need to create a second image – you need to use the duplicate command to create a second version of your image.

screen-shot-2017-02-12-at-19-36-05

Then click on the costumes tab to be able to edit it a little bit so that you can make your second sprite slightly different, thus giving the appearance of animation.

screen-shot-2017-02-12-at-20-04-20

Finally, you need some simple Scratch code to get your image moving – I’ve put a couple of broadcast commands in here to clear the SenseHat before you start and to make sure that the background is black (so turned off).

screen-shot-2017-02-12-at-19-36-38

You can experiment if you want by changing the background colour, although this will only make a difference if your sprite is ‘backgroundless’ (but you have to make sure it’s still only 8 pixels/2 squares wide).

screen-shot-2017-02-12-at-20-11-12

I’ve had great fun recreating this project in Scratch and I’ve set Stuart and Kirk on a mission to figure out the ‘shake’ control too so hopefully I can add an update soon.

<edit> Kirk and Stuart have successfully managed to get shake working and are now celebrating with chocolate cake

img_0908

</edit>

Part two of this project can be found here.

All thanks to Albert Hickey for his advice with this project – he is a Scratch and SenseHat guru!!

Watch this space for some more projects using Scratch soon!

Etcher -the BEST tool ever for burning OS to SD cards

A couple of years ago, I wrote a post about burning SD cards on a mac… but I’m not gonna lie, I found it quite difficult to do. You can imagine my delight, when someone at work suggested I try Etcher near the end of last year. What a fantastic app for making burning SDcards easy!

Just a reminder – when you’re using a Raspberry Pi, you need to install an operating system on your microSD card. Most Pi users install Raspbian, however, I’ve been using pi-topOS a lot for work. Installing an OS usually requires wiping the SD card manually then using clumsy software or even accessing the command line to install the new OS. Whereas with Etcher, you get clear feedback on process in a very easy, visual way.

Etcher is available for Windows, Mac and Linux, it is free to download and easy to install.

Screen Shot 2017-01-31 at 14.57.50.png

On my old MBA I had a lovely SD card slot so it was REALLY simple for me to use – literally I downloaded the latest version of Raspbian or pi-topOS, put the SD card in, select the downloaded file (no need to extract the file, just use it as is), select the SD card and Flash!

Check out this gif from the Etcher website – it really is that simple!

product.gif

So… one peril I found was in my own stupidity.. I nearly flashed my USB stick instead of the SD card, only noticing at the last minute that the drive I’d selected was too big to be an 8GB SD card…

I’m sure you can turn it off, but Etcher automatically verifies the SD cards its burning, which does double the time it takes the burn an image. However, I found it used very little processor power and I quite often had SD cards burning in the background while I got on with my other work, which meant that by the end of the day I’d burnt a fair few SD cards to be workshop ready (I’m OCD, I like things to be prepared).

Seriously, I can’t fault Etcher, it has a fantastic interface, it’s easy to use, you don’t need to pre-wipe the SD cards, you just pop them in a burn away – so, so easy!

Good luck and enjoy!! Now… how do I burn SD cards on my new MBP??


A Strange Experience – Being on the Other Side

Since I’ve been working for pi-top, I’ve experienced being on the other side of the EdTech system and it’s certainly been a bit of an eye-opener

I’ve tested various products over the years and found problems and complaints, bugs and surprises, delights and nightmares, but it has been a really interesting experience for me being a producer of content rather than just a consumer.

Firstly, I thought it would be really easy to implement all of the things on my ‘want’ list – it turns out that it’s nowhere near as easy to just ‘add a button that prints out all of the users’ or ‘add a widget that allows the teacher to find out the answer’. All of these things require thought, tweaking of the UI (user interface) and lots of code.

I’ve learnt that things that seem obvious to me are not necessarily useful or even acknowledged by other users.

I’ve learnt that a developer can spend two weeks working overtime to completely overhaul the interface and I’ve not even noticed a difference (sorry).

I’ve discovered that it’s really important to make it clear what the delete button does… and I definitely didn’t accidentally delete a huge chunk of a resource which, thankfully, had been backed up.

I’ve found out that it’s really, really important to get more than one opinion and that relying on mine alone is not enough.

I’ve learnt that developers can’t write resources for beginners even though they really, really mean the best and want to help.

I’ve learnt that even someone like me can make things too difficult for beginners and it’s important to have someone who is truly a novice to try things out.

I’ve found out that sometimes developers just want to sit and watch you use the interface whilst giving them a running commentary so they can figure out what needs to be done next.

I’ve learnt that creating good quality content takes time, creating interfaces takes time and editing information takes time.

I’ve discovered that ‘popping over to ask a quick question’ is akin to tossing an hour’s worth of work into the bin for a developer and it’s better to contact them over Slack.

I’ve found out that developers don’t read emails…

Above all, I’ve learnt that being this side of the interface is HARD WORK and although we sometimes get frustrated with developers bringing out software that doesn’t do exactly what we want it to do, it’s not through lack of trying. It’s pretty important to give developers constructive feedback explaining exactly what doesn’t work as you’d expect and what you’d like it to do instead rather than getting cross and frustrated with it. Communication is vital to ensuring that a product is the best it can be.

Finally, I’ve learnt that pi-topCODER is going to be an incredible resource when we’re done with it and I’m proud to have been part of the team working on it, even if I sometimes feel like I don’t really know anything compared to the people making it!