Quest – Text-based adventure game (creating a room)

If you’ve not read it yet, here is my first post about Quest/ActiveLit.

I’ve just sat down for about an hour and a half to try and create my first room in ActiveLit. I’m not going to lie, it was quite hard work, but it feels like the next room will be a lot easier now that I’ve done it once and I’m really pleased with the results.

So, the first thing I did was to create a simple map of my intended game – turns out I was definitely being over-adventurous and I would suggest you make a simple 4 room map with the children.

IMG_5051

So, my first room was hopefully fairly simple – there is a locked door which can only be opened by collecting a floppy disc from a box and using it with the BBC Micro in the corner of the room. In my mind, that wasn’t too much to ask for, but it did take me a while to get my head around the interface.

I didn’t change anything about the basic setup of the game except to activate the light and dark setting (meaning that rooms can be dark until an object is used). I wouldn’t worry too much about your basic settings for the time being – I just had a strange desire to have a torch or a light switch somewhere in one of the rooms just because it was an available option!

So the first thing I did was create a couple of rooms (I discovered that to have an active ‘locked door’ you need a room for the door to lead into so it’s no good just having one room). A key thing that you need to think about when creating a game is that in order to create interactive objects, you have to have created both of the objects (and anything else they need to interact with) before you try to set up interaction.

Screen Shot 2014-07-31 at 14.28.01

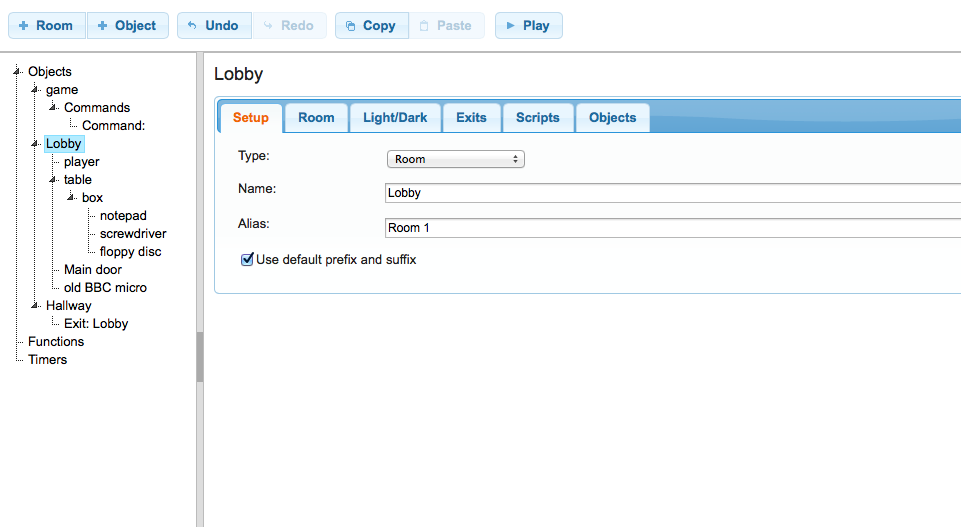
You will see from this diagram that I have two rooms – Lobby and Hallway. The hallway only has a link to the lobby exit – at the moment it is only there as a placeholder. Inside my lobby I have the player, a table (with a box containing various objects inside), a door and an old computer (which I want to be the ‘key’ to opening the door).

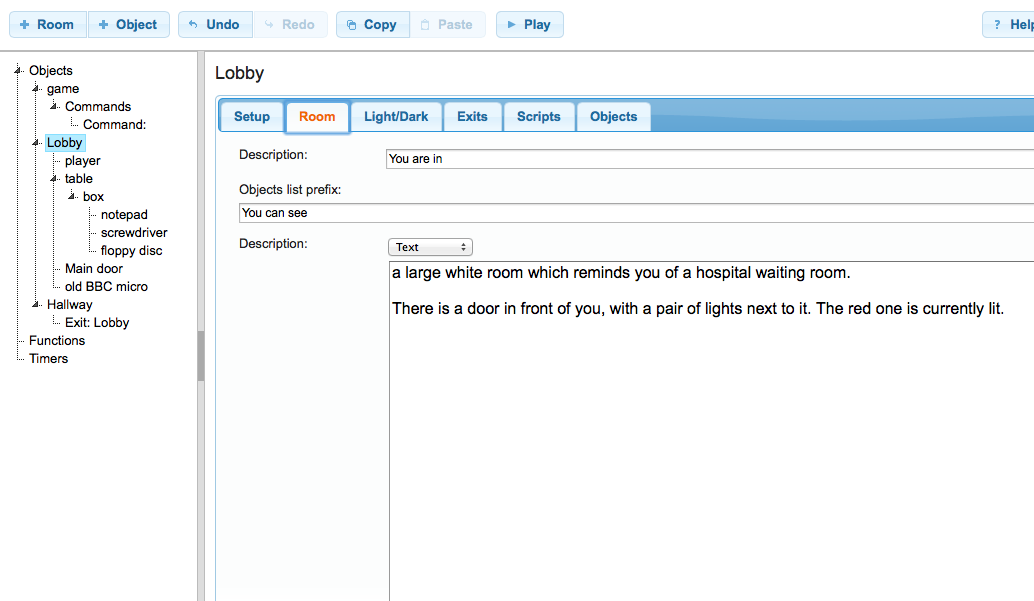
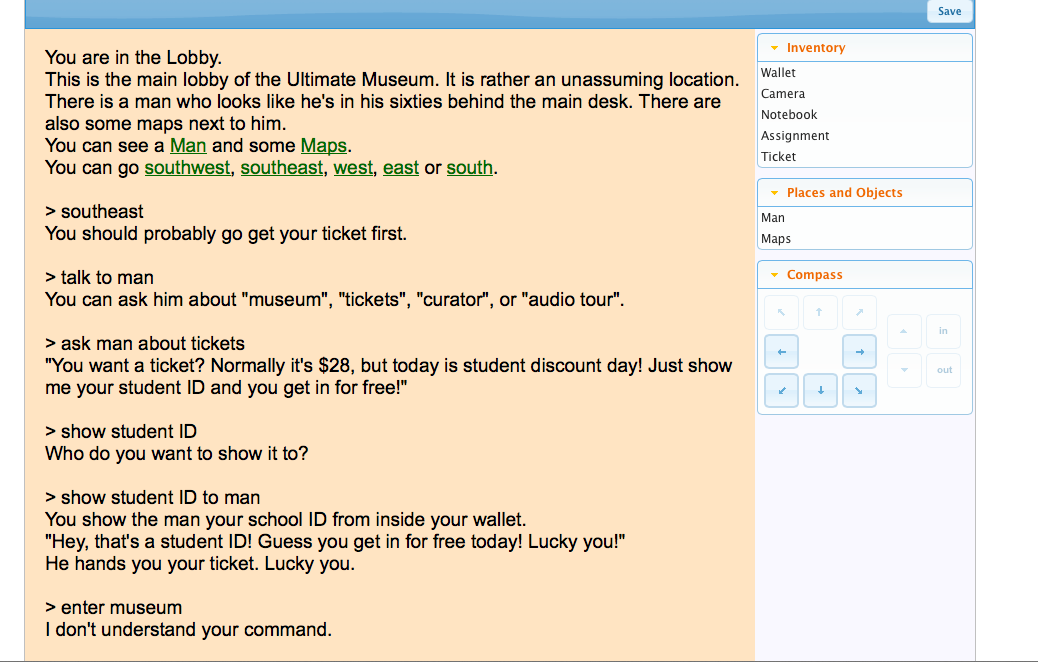
In the room tab you can write a description of the room, but you don’t need to list any objects as the programme will do that automatically. You can also see that I have added one exit which is to the hallway

Screen Shot 2014-07-31 at 14.28.11        Screen Shot 2014-07-31 at 14.28.21

Each of my ‘top layer’ object are listed in the lobby objects list.

Screen Shot 2014-07-31 at 14.28.32

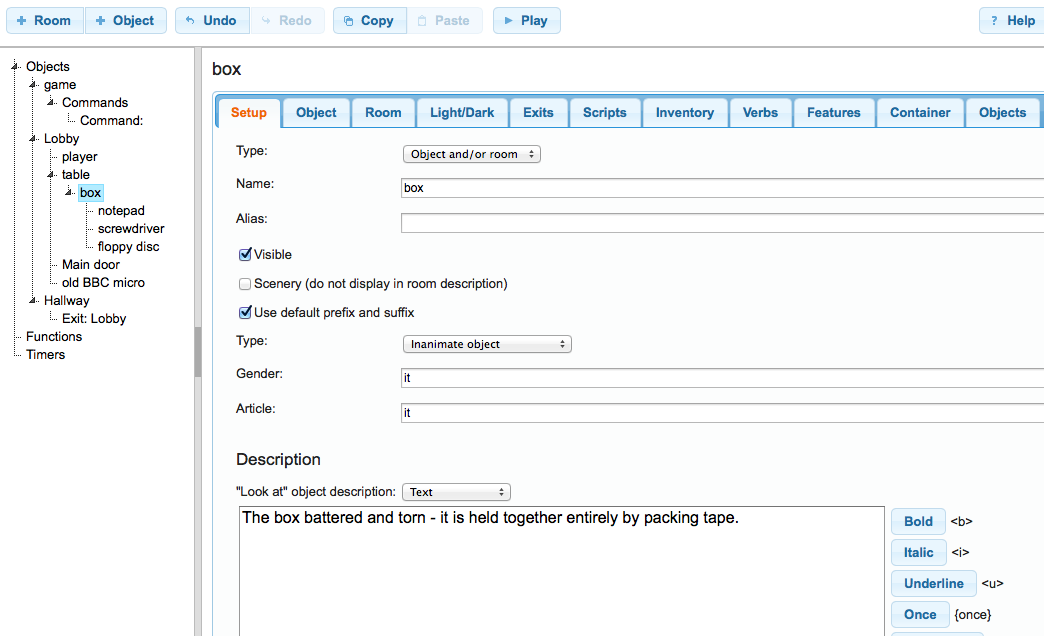
You can choose whether to set up new objects as ‘an object’, ‘a room’ or an ‘object and/or room’. My table needs to have the box on it and then the box itself needs to contain other items so they both need to be labelled as object/rooms, whereas everything else gets to be just an object.

Screen Shot 2014-07-31 at 14.29.03Both the box and the table are turned into containers/surfaces in the features tab Screen Shot 2014-07-31 at 14.52.05
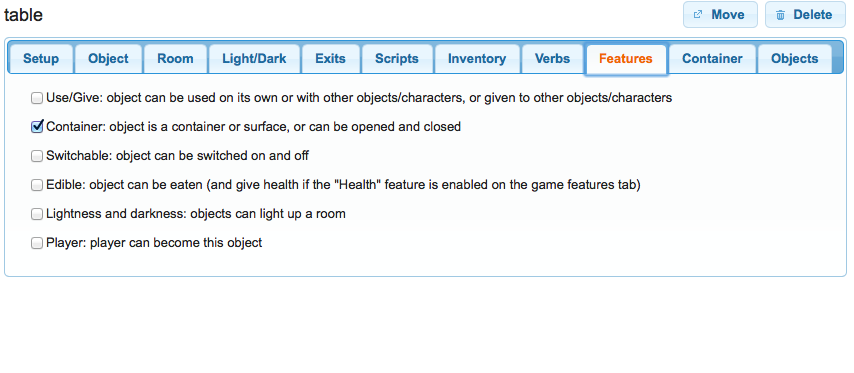
and this helpfully adds the container tab to the object, allowing me to dictate whether or not it is a container or a surface – the table is labelled as a surface and I have created the box as an object within the table so that it is listed as being on top of the surface.

The cardboard box that I wanted was created as a ‘closed container’ which could be ‘opened or closed’ and I could tweak settings so that the objects inside became visible on opening, however, initially the opened box didn’t list the new objects and they didn’t appear to be discoverable until I added a ‘print message’ line in the ‘after opening the object’ tab, listing the objects inside (it seemed to automatically realise I wanted the objects hyperlinked) – for each new object I had to press the ‘add new script’ button, which allowed me to add another object or event to the action box.

Screen Shot 2014-07-31 at 14.54.02

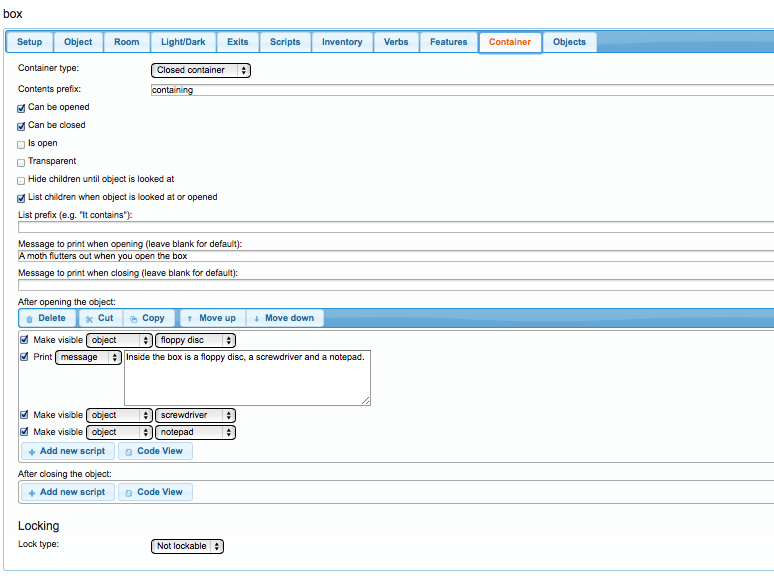
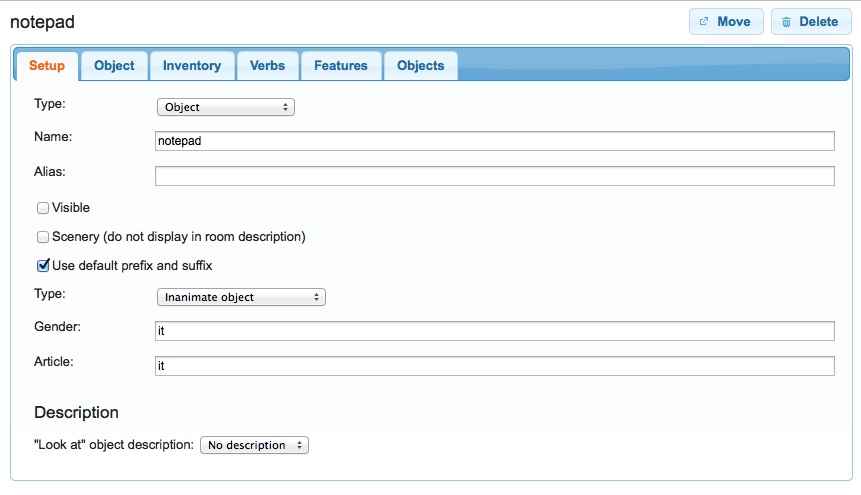
I didn’t want the objects inside to be visible until the box was opened so when I set them up, I made them invisible by unticking the box in the setup tab.

Screen Shot 2014-07-31 at 14.56.52

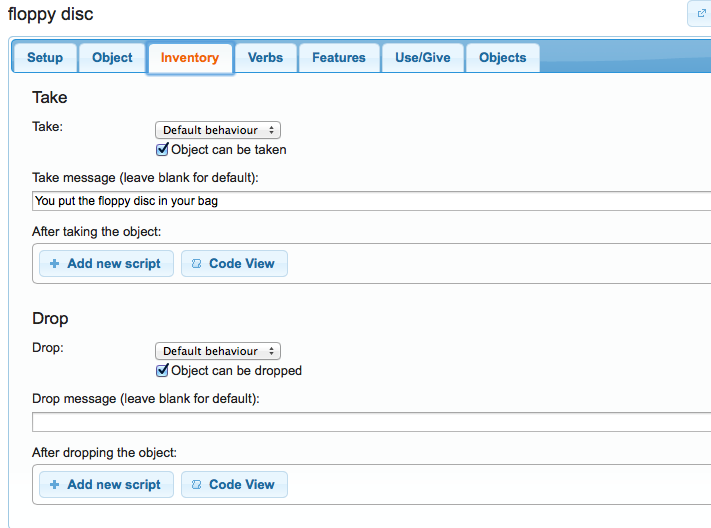
I only wanted the floppy disc to be a takeable item and so in the inventory tab, for the other 2 items I simply made sure the ‘object can be taken’ box was unticked and then added a ‘take message’ along the lines of  ‘this item cannot be taken’ and gave silly reasons why each one could not be taken, whereas for the floppy disc I made sure that there was a clear message after you have taken it.

Screen Shot 2014-07-31 at 14.59.53So, finally, I had the fun bit of code to do – I wanted to be able to put the floppy disc in the computer an have it unlock the door.

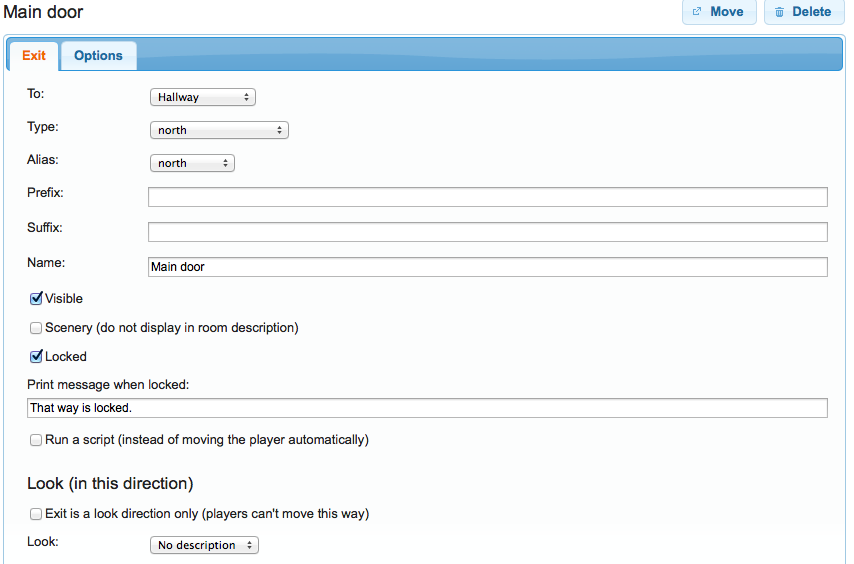
When I initially set up the room, I set up the exit to the hallway, now I went into the settings for this and changed it to a locked door:

Screen Shot 2014-07-31 at 15.04.38

So now I need to create the object to unlock the door, my BBC Micro Computer

Screen Shot 2014-07-31 at 14.28.47Screen Shot 2014-07-31 at 15.07.45

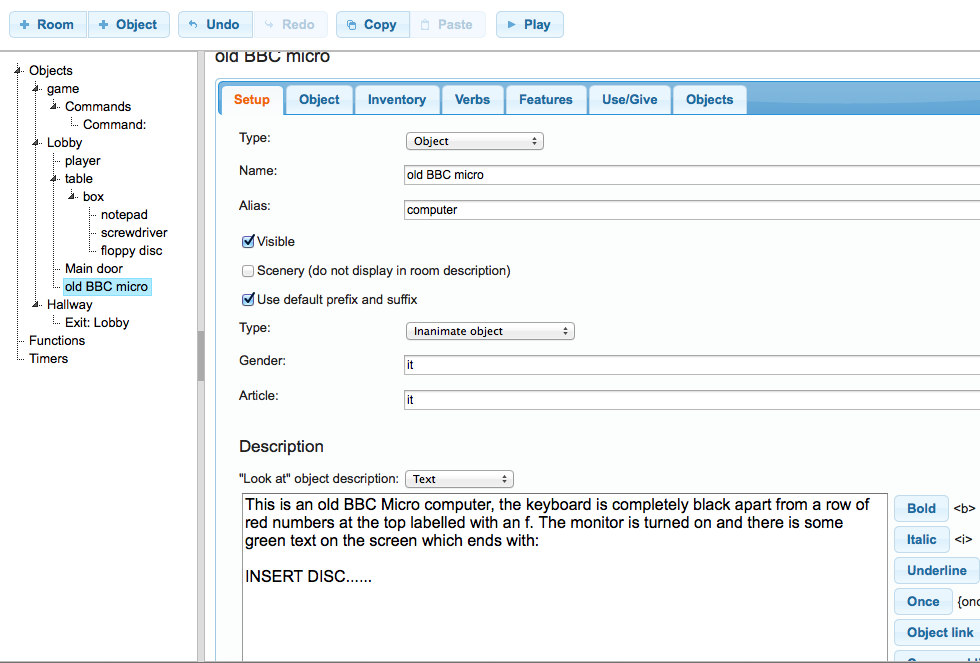
By ticking the first box in the features tab, I was able to make my BBC interact with another object (I also did the same thing with the floppy disc!).

Screen Shot 2014-07-31 at 14.28.55

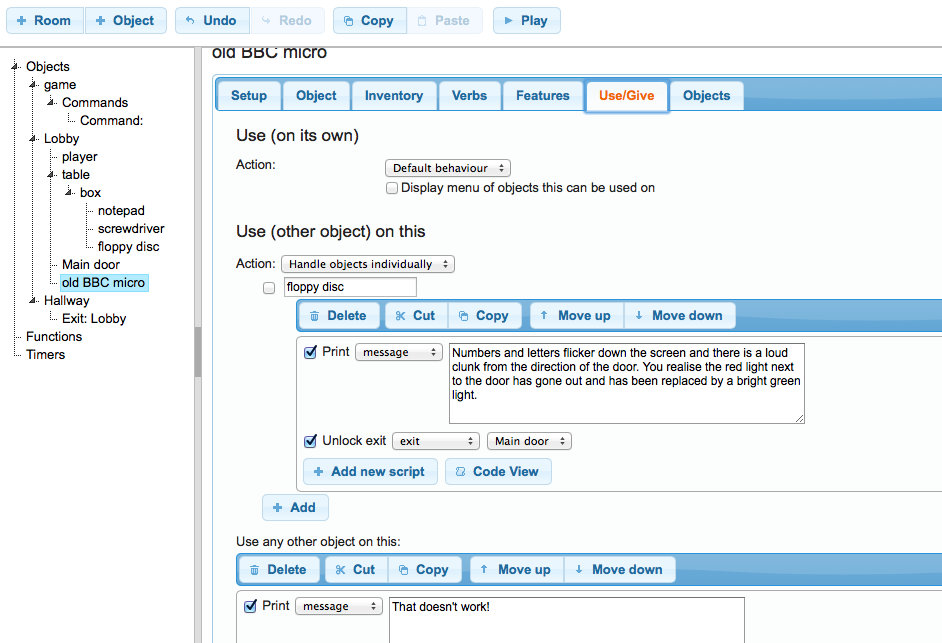
So, in the use/give tab I was able to select the option “use (other object) on this” which allowed me to specify that the floppy disc would both prompt a message AND unlock the door (by clicking the ‘add new script’ button). You will see that I also added a message for the “use any other object on this” just for the fun of it.

When the room is played through, other than the message displayed above, there is no indication that the door has been unlocked so the creator needs to make sure that the person playing the game knows it has been unlocked.

One thing that I relied on while making this game was the ‘save’ and ‘play’ options as it was only through playing my game that I was able to debug it and figure out what I was doing wrong – users should definitely be encouraged to use these after every new object is added in.

Now that I know what I’m doing, I’m off to create another couple of rooms and see how long it takes me to create my whole 13 room map! I may be busy for some hours!!!

Quest – Text based adventure games (intro)

When we were looking at the new curriculum last year, we were drawn to the idea of looking at text based adventure games and it was penciled in to our Year 6 curriculum. From September I’m the one who has to find a way to introduce and teach this topic so I was really pleased when someone on twitter mentioned Quest. Today I took my first look at this software and will be creating a couple of posts as I try and figure out what to do.

For those of you who remember, way back in the eighties most people didn’t have consoles, or even machines powerful enough to display brightly coloured images and so we had to make do with playing text based adventure games on Commodores and BBC computers (and whatever else followed). I remember, as a very young child, playing a lot of these games and getting incredibly frustrated, but also hugely addictive. Like Ian Livingstone’s fighting fantasy books, they allowed you to control the story you were reading and it was really good fun. Just an aside, does anyone else remember Granny’s Garden – the ultimate text based adventure game for children because it had a few rubbish 8-bit pictures and some terrible music (yeah, I bet you’re humming it right now).

Anyway, the first thing I did was create an account on the Quest website, at which point I noticed a link to ActiveLit described as interactive fiction for schools and groups, which seemed much more like what I was looking for so I also signed up for that.

ActiveLit let me create individual user accounts fairly easily although there doesn’t seem to be a bulk upload option (yet), whereas Quest wanted email verification for each user – having logged into both with a test account, they both seem to have the same interface, but ActiveLit allows the teacher some control, which is fine by me!Screen Shot 2014-07-30 at 21.53.59I realised, while thinking about this topic, that in a world of PS4 and Xbox One as well as smart phones and iPads, most children would not have ever experienced a text based adventure game and so one great feature of ActiveLit is that you, as admin user, can select games that have already been made and get the children to explore them:

Screen Shot 2014-07-30 at 21.56.41Screen Shot 2014-07-30 at 21.59.13

For now, I’ve picked one at random from the education section for the children to explore – I’d like to take a really good look at some of these to ensure they really are educational (it’s already upsetting me that the bottom game has the American spelling of labour).

For me, the single most important lesson to be taken from text based adventure games is that you HAVE to choose the right words; your spelling and syntax needs to be correct otherwise nothing happens. This is such an important lesson when it comes to code (and basic literacy if we’re being honest) that it can’t be ignored. By playing a few games, the children should begin to understand how this works (and how frustrating it can be when a simple misspelling can cause an error).

So, when my test pupil logs in they see the following:

Screen Shot 2014-07-30 at 22.15.19

At the top, a list of games I, the admin user, have suggested they look at and then either to the right or below, their own creations.

For now, I would suggest the first lesson for both teachers and children is to simply play a game and see how it works – having played with a couple, it seems that the interface allows you to create slightly more complicated games then I remember, with much more visual controls (an inventory list, a compass with possible directions highlighted and even a list of interact-able items).

 Screen Shot 2014-07-30 at 22.17.20

However, this does seem to be optional as you can see (yes, this really is the original 1984 Hitchhiker’s text based adventure game written by Douglas Adams):

Screen Shot 2014-07-30 at 22.18.46

Once I’ve had a chance to try out the creation interface I’ll be writing a new blog, but that’s all for now folks.

*edit*

I’ve just discovered something else really good about the admin panel – it has a VERY detailed log of users actions so if I take a quick glance at my test session yesterday, you can see exactly what my test user has done!

Screen Shot 2014-07-31 at 12.51.14 Screen Shot 2014-07-31 at 12.51.45This will provide an excellent opportunity for assessment and discussion about success criteria. It can be shared with the class to discuss ideas and suggest solutions or used for one to one discussion with someone who, perhaps, isn’t able to understand how the game works.

I have to say, I am REALLY impressed with this feature.

Raspberry Pi – Switching it on

Provided you have everything plugged in correctly, the first time you login a screen like this will pop up (don’t worry, after the first time you won’t see this again unless you want to):

raspi-config

If, like me, you’re a complete novice to the pi, simply use arrow keys to move down to ‘finish’ and press enter (the mouse doesn’t work in menuconfig).

Unless you have changed it, the default username is pi and the password is raspberry – when you type in the password, nothing appears on the screen and this can be unnerving for first time users – fear not, it’s perfectly normal.

You’ll now be presented with the command line (I have only just discovered that code can be typed directly into the command line, without booting up the operating system). The command line is usually a black screen with white writing and, in the case of the Pi, a green cursor marker or some green text.

loginpi

If you know a bit of Python, or you’ve downloaded an OCR card such as the Singing Jelly Baby and want to just make the Pi DO something, you can start typing in code here, but it is more common to head into the graphical operating system, Raspian, by typing in ‘startx’ and hitting enter.

This will take you to the Pi’s desktop, which should look a bit like this:

raspberry-pi-desktop-8-580x358

If you have bought an SD card which comes with a pre setup operating system, you may not have the latest versions of some software, but fortunately it is fairly easy to get things sorted out.

So, you have several things ready to go – Midori is the Pi’s internet browser (be prepared for it to be slow), Idle and Idle 3 are both used for coding in Python – there is an interesting debate about which to use, but for the time being stick to Idle, which recognises the language of Python 2. LXTerminal is your main command tool and then you have Scratch. You also need to figure out how to install Sonic Pi and Scratch GPIO so here’s the first bit of code you’ll need to use (you’ll need to be connected to the internet):

OPEN UP LXTerminal

Type in:

sudo apt-get update

press enter and type in:

sudo apt-get install sonic-pi

This should install Sonic Pi on your Raspberry Pi – cool huh?

Just so you know what you typed in, SUDO stands for “Super User DO” or, admin user is asking you to do something. The apt-get update is basically saying – check for updates, but don’t actually do anything with them. Your next line of code says “see that update for sonic-pi, now you can install it”

For Scratch GPIO, here are the two lines of code to type into your LXTerminal:

sudo wget http://goo.gl/Pthh62 -O isgh5.sh

sudo bash isgh5.sh

One of the joys of the Raspberry Pi is that it took me around 30 seconds of searching the internet to find the information to install both of those applications – the Pi community is large, friendly and eager to share. You will find that any problems you have are quickly dealt with by helpful users so don’t be afraid to ask.

One other key bit of information – to turn the Raspberry Pi off, you MUST type into either the command line or LXTerminal:

sudo halt

and this will power down your Pi – try not to just unplug it as this can corrupt it!

Raspberry Pi – basic setup

When you first invest in a Raspberry Pi, there are a few things you need to know:

Firstly, if you buy a Pi, you are just buying the little circuit board bit, which looks a bit like this:

RaspberryPi Raspberry-Pi

Most people who already own a Raspberry Pi will probably have the first of these pictures, which is called the model B, however, as of last week, new buyers should be aiming to get their hands on the model B+, which is a significant improvement on the B.

So, let’s say you bought your Raspberry Pi from CPC, all you have bought for yourself is the basic board and without a few bits and pieces, there isn’t much you can do with it. You NEED a power supply, you NEED a memory card, you NEED something to display your Pi on and you need a mouse and keyboard! So, while we’re told it’s a computer that costs about £25, in reality you need to spend a bit more than that. If this is your first time on the rodeo, I suggest getting something like this kit from Pimoroni, which gives you everything you need, including the Pi and a case (a must have when working with children). The only thing that you’ll need on top of that is an HDMI* monitor/tv/projector.

* if you’re not 100% certain, most projectors and monitors for the last ten years+ have been VGA, newer televisions and monitors tend to have an HDMI connection which basically allows you to view things in HD or high density. HDMI cables look like this so please check that your monitor/tv/projector works with them:

HDMIcable

Having said that, I’ve just been messaged by a fellow picademy alumni, Laura, who has pointed out that it is fairly inexpensive to purchase an HDMI to VGA adapter if your monitor doesn’t have the right kind of ports so don’t panic if this is the case!

The Raspberry Pi model B takes a standard SD card whereas the B+ takes a mini SD card – I would recommend that you buy your SD from Raspberry Pi (or somewhere like Pimoroni) so that you get the latest operating system and don’t have to spend time downloading and installing it on your card. Don’t make the mistake that I did and get your kit from Maplin – it seems tempting, but compared to the authorised dealers such as Pimoroni and CPC, you just won’t get the same kit for your cash.

The next thing you need to figure out is where to plug all of your bits and pieces. If you have a model B then you will need a USB hub in order to get everything plugged in, whereas the B+ has enough USB ports on it to not need the extra bit.

If you want to connect to the internet you will need to either invest in a wifi USB stick or plug it in via ethernet cable (the grey cables that run from the wall into the back of your computer and provide internet connection). I would recommend the wireless (wifi) option, just so you have less cables hanging around – it is helpful to be connected to the internet so you that you can download software, but more on that later.

Once you have your Pi setup then you’re ready to go start using it for fun and exciting projects.

The Raspberry Pi

The reason I started writing this blog was down to the lovely people at the Raspberry Pi Foundation who kindly offered two days of free training. I was so inspired by everything I learned that I was eager to pass on my knowledge. I know that the Pi pages are going to take up a significant amount of this blog so bear with me as I create them….very slowly!

So what is a Raspberry Pi?

Take a look at the lovely video found at the top of this page for a basic outline: http://www.raspberrypi.org/

But what does that mean for a teacher? Well, up until now all of the software I have talked about allows you to manipulate objects on a screen – with the Pi you can do so much more.

On my training course I was shown how to use the Pi to create working traffic lights that plugged into GPIO pins (more on that later), how to type in lines of code to ‘cheat’ in Minecraft, how to plug in a camera and type in lines of code to make it take a photo and how to code music in Sonic Pi – the upshot of all of this was that, with some of the other teachers on my course, we made a bear which took photos from the click of a button on it’s paw.

10514587_10154343948685024_4313076038013775225_n

For me, the beauty of the Raspberry Pi in the classroom is that you get a very definite physical output – you do the work and you achieve something, not just on the screen, but in real life! There is something so satisfying about the first time you get the code right to take a photo or get the traffic lights moving in time, whether you programme it using Python or even Scratch, you are left with a real sense of achievement.


Codecademy

My boyfriend and I discovered Codecademy over Christmas 2013 – neither of can remember how we first found out about, but we started off competing against each other to see who could get the furthest in Python. When I started teaching coding to years 3 and 4 in January 2014 and started to run my Code Club with Year 5 and 6 I thought it would be a good idea to show the children what they could learn to do – at that point in time I’d just managed to code a PygLatin generator in the Python tutorials (rather upsetting for me, this has now been changed and made easier so that it no longer has a clause for changing the code if there is a vowel at the start of the word). Anyway, I rather proudly showed the children my lines of code and explained that their eventual goal would be to write code like that.

After two terms of Code Club, I have three boys who are entering Year 6 in September who are now over 30% through learning Python and determined to get ahead of me (they quite possible already have now!). More surprisingly, I have a young lady from the same class, who joined Code Club in Term 2 and isn’t a particularly enthusiastic computer user, however, she has now made it her goal in life to work through Codecademy, no matter what the cost – for me this is one of the biggest achievements of the group as she is an average achiever with confidence issues – she’s doing something now that barely anyone in school can do so she doesn’t feel like she’s competing with anyone or going to fare badly compared to other people so she can be independent, make mistakes and it doesn’t matter. She mentioned trying to work through some of the problems at home and asking her parents and older brother for help only for them all to exclaim that it was too difficult for them – this made her day!!

I’ll start with a brief warning – this website is NOT made for children, it is aimed at adults like me who want to expand their knowledge and so sometimes the wording of the text can be really tricky for the children to understand. Please do not expect this to be easy to follow – I’m still confused and find things tough and I’m only up to 33% – my partner gave up around the 75% mark, but only after I helped him with the early on logic stages (he just couldn’t get the hang of not, and, or!).

Since I first signed up, Codecademy has gone through a bit of a facelift – it’s all shiny and posh. The children usually sign up with their school Gmail accounts – fortunately it doesn’t seem to require any email activation so we can use their school accounts without any emails bouncing back!

Screen Shot 2014-07-19 at 20.19.07    Screen Shot 2014-07-19 at 19.57.54

They also seem to allow you to learn a huge selection of programming languages.

Screen Shot 2014-07-19 at 20.22.52

But for now, let’s just start with Python – you’ll notice that it says on the picture above that I’m only on 30% – this is a rather frustrating and bizarre issue with the site. Since I first started, the Python programme has been revamped meaning that, as mentioned above, in some sections, such as PygLatin, the code has been simplified – I’ve done the more complex code so that means I’ve managed to complete more than 100% for some sections, but I’m still only about 30% through the new course.

Screen Shot 2014-07-19 at 20.25.17

This issue nearly caused two boys to fall out one week because, for no apparent reason, one child was 1% ahead of the other even though they were on the same page – it turned out he started working through the course a week earlier and in the meantime it had been updated.

Anyway, let’s take a look at lesson two of Python to give you an idea of the layout:

Screen Shot 2014-07-19 at 20.28.14

On the left of the screen is some information, your instructions and then a hint box. The main body of the page allows you to enter your code and the black box in the top right is the action box where any printed code will appear (for example if you do some maths in Python, the answer will appear in the black box – this will also be where any error messages will appear if your code is incorrect). The big blue button at the bottom will go green if you’ve solved the problem.

Screen Shot 2014-07-19 at 20.30.48

The instructions start off fairly simple – you just learn what some of the different terms mean, but they quickly get quite complicated:

Screen Shot 2014-07-19 at 20.46.16    Screen Shot 2014-07-19 at 20.47.41  Screen Shot 2014-07-19 at 20.47.18

When the children first started having a go at Codecademy, there were a few times where I thought I’d never be able to help them, but in all honesty, helping the children has really helped my own understanding and I feel quite confident now with debugging the first 30% or so. Now I just need to find the time to push myself further through the course.

As with the Code Club resources, the children began to help each other solve issues – the most common ones were indentation – realising that after certain statements you need a colon and to indent the next line 3 spaces or one tab (turns out this is a common problem with all coding) and forgetting capital letters. Codecademy itself is really pedantic about this even when looking at strings, which are generally user defined rather than part of the code. I honestly couldn’t count how many times we had the following error message:

Screen Shot 2014-07-19 at 20.52.15

Still, at least the children were being encouraged to read their error messages (my general policy for a lot of help the children asked for was to say “work it out yourself” – harsh, but necessary).

Since the children who were working through the Code Club Scratch resources were earning certificates I decided to create* a certificate for Codecademy for achieving 20%, but since it got so difficult after that point, I decided to start giving certificates for every 10% after that!

Screen Shot 2014-07-19 at 20.58.02So, Codecademy is a great resource for someone with a desire to learn to code properly. I would actually recommend that any teacher who wants to teach Computing at least have a go at one of the languages, if only to get an idea of the structure and that all important syntax. It is sometimes frustrating, sometimes downright silly and sometimes so difficult it makes you want to cry, but there is a massive sense of achievement when a piece of code does what you want it to and if my 9-10 year olds can have a go then anyone can!

*I say ‘create’, but what I mean is ‘filled in the gaps on a template’ on Pages for the Mac 😉

Code Club

Last Autumn my school was approached by a parent who worked for one of the big investment banks. He came to us as a representative of CAS, which, at the time, was an organisation I’d never heard of. Computing At School had been one of the many groups petitioning the government for a change in the curriculum and had a goal of supporting teachers and schools with introducing the new curriculum. He also mentioned a useful coding scheme of work called Code Club.

Within an hour of him leaving, I had already signed up to CAS and was investigating Code Club.

CAS is a great site, however it can be quite confusing and intense unless you have something specific in mind. I love the ideas behind it, but for a novice like me, I can find it all a bit overwhelming. Also, when I first signed up, it automatically sent me daily update emails, which just seemed to clog my inbox and annoy me. Now that I’m a bit more confident, I know I can use CAS to look for resources, as long as I know what I’m looking for, but I still wouldn’t go there instinctively. The other problem is that a lot of the resources, though helpful, are made with the assumption that you have some prior knowledge, which is not always the case. Having said that, I downloaded a lovely physical computing lesson plan which involved the children physically being a search engine (as a way of explaining how the world wide web and search engines work). One thing that CAS is really keen on is what they call ‘physical computing’, which does seem to be a great idea. Instead of explaining binary, act out binary, instead of explaining that your code syntax must be correct, act out being a line of code and see what happens when you misspell things or put them in the wrong place.

Anyway, I also started to look at Code Club and the first thing that CC asks you to do is to search for a volunteer – this is my problem with the site – I spent a good few weeks mindlessly emailing their lists of volunteers, most of whom didn’t reply at all and the two that did both sent a terse “no I’m already running a code club” back. It would be helpful if volunteers could tick a box saying that they don’t want to be approached by any other clubs when they find one. From my experience, most club volunteers directly approach a school because they have some connection with it (the parent mentioned above did offer to help, but only if we could run an 8am club, which I just don’t have time for). Anyway, disheartened and a bit cross, I took the plunge and decided to run the club myself; I really wish I’d done this from the outset as it would have saved me a lot of time and effort, particularly since the resources are so well written and easy to follow.

When I last looked, there were 4 terms of code club resources, however, their aim is to have 6 full terms of information. The first two terms are titled Scratch and Advanced Scratch, then CSS and HTML, followed by Python.

The first term contains three ‘levels’ of Scratch games to make: each level has three games in it. My first reaction was that the children would finish it all well before the end of term – 9 games, 9 weeks right? How wrong I was….by the end of term 2 I had 3 children that finished level 2 and that was the furthest anyone got….having said that, we did get distracted by Raspberry Pi and Codecademy, but more on that later.

What I really liked was that not only did you get instructions and ideas, you got detailed guides for the children (printed, laminated and stuck in a lever arch file), guides for the teachers, cool ‘badges/cards’ that can be laminated as proof that you are part of the club (never underestimate the power of a laminated card), you get certificates to print out along with the twelve original Scratch cards and three more which they have created themselves because they feel they are important skills too. There is also a register with a handy tick-chart to monitor progress, which I left in the front of my folder and allowed the children to tick off when they had finished a project.

So, here’s what I did (spot the OCD teacher here) – I printed off each of the projects (nine in total), I laminated four copies of each, hole punched them, threaded them with a treasury tag and allowed the children to work through at their own pace. The initial plan had been to work on a project each week with a whole class input at the start, but the children worked at such wildly different rates and became so independent that I didn’t need to input, I just had to be on hand to debug AND after a few weeks, the children began to debug each other, which was such a wonderful thing to observe!

The first project, Felix and Herbert, was fairly simple and most children managed it without too much support – most children didn’t notice the instruction to click the button to stop the cat rotating and keep him on a horizontal axis, but otherwise there weren’t any problems except a slight delay with a costume change from a mouse to a ghost that seemed to be a flaw in Scratch rather than anything to do with the programming.

There were  a few problems with Whack-a-witch when the sound file only played intermittently and occasionally the witch disappeared never to return, but again these seemed to be Scratch problems rather than any issue with the code and the classic ‘save’, ‘close’ and ‘reload’ seemed to do the trick.

The third project, called Fireworks, involved teaching a few new skills as the children had to import 5 image files and a sound file, which I simply emailed over to them and got them drag and drop onto their desktop then they had to navigate the Scratch interface to access the desktop and import the files. I also had a few issues with the suggested code – I’m not sure if it was meant to be deliberately wrong to encourage children to think for themselves, but the gist of the project was that the firework shot into the air, banged and then turned into an explosion picture before disappearing. The code given by Code Club wanted you to use two separate sprites and have the rocket sprite disappear and be replaced by one of the 4 explosions (in a random colour), but I found it more elegant to simply have it set up as a secondary costume and then when the instructions asked you to make the firework select a random explosion, setting all 4 as extra costumes and asking the programme to select one at random made much sense than getting it to chose a random sprite (if you’re not sure what I mean by sprites and costumes please take a look at my earlier post about Scratch).

I haven’t needed to help the children who worked through level two – they were confident enough by that point that they helped each other through any problems and so any problems they came across were sorted out without me needing to be involved – scary but true.

Having said that, one of the main reasons I haven’t been helping the children working in Scratch as much is that I got distracted by learning about the coding language Python on the website Codecademy and working with a handful of children who had decided that they wanted to move on from block based languages and sink their teeth into a real, wordy programming language…..

Scratch

Before I start, I should point out that Scratch is completely free and can be found here: http://scratch.mit.edu/

I was first asked to use Scratch about a year ago and I had no idea what I was letting myself in for. I hastily scrabbled around the Internet and found a couple of videos on the Scratch website. They weren’t as useful as I hoped and I admit to giving up fairly quickly.

I have since learned that from the Scratch website you can get hold of a fabulous resource called Scratch cards which are just simple user guides; these are absolutely great. In my previous post I talked about using Espresso Coding as a gateway and this was my next step once the more able children realised the limits of Espresso. I simply printed and laminated 4 copies of each Scratch card and placed them inside plastic wallets in a ring binder folder – the children all helped themselves to the cards and worked their way through them – all self differentiated. By the end of the the first lesson the class seemed much more independent and optimistic about coding and, with Scratch, they had to think more carefully and thoughtfully about what to produce.

Even better, as some children became more confident, I was able to start pushing them onto the harder Code Club Scratch resources and by the end of one full term of coding, I had several Year 3 children who had completed the whole of ‘Level 1’ of Code Club (which is aimed at Year 5/6 children). I’ll write a separate post about Code Club, however, as there is so much to say about that.

The basic set up with Scratch is that it is what is known as a ‘block-based’ coding language. That is, you drag and drop blocks in order to build your code. The children are expected to realise fairly early on that if you don’t put your blocks in the right place, things don’t do what you want.

It functions in its own operating system meaning that it can be confusing for children to figure out how to save (things aren’t in their usual place), but once you’ve got the hang of the basics, it becomes fairly simple to use.

ScratchYou’ll see from this picture that you have four main sections to your screen – the block selection tools, the code box, the image you’re manipulating and the sprite selection.

The first thing I want to talk about is the sprite, which in Scratch refers to the thing that you want to manipulate and make move. This is separate from the background – you will notice on this picture that in the bottom right is both a white space and a tiny cartoon cat – the white space is the background, which can be changed, but not animated, as well as the current sprite, the cat. You can have as many sprites as you would like in the screen, but every time you write a piece of code, it only appears, and only works, for the sprite you currently have selected. You will not be able to type any code if you have the background selected and one of the most common mistakes I come across is children inputting their code onto the wrong sprite and then being frustrated when it doesn’t do what they want. You can also delete sprites either by right clicking or holding down control and clicking – any new document in Scratch always starts with a blank background and the cartoon cat.

Sprites can either be imported from the large selection Scratch provides, or you can draw your own using the paint tool – I even imported a photograph of myself once and made myself into an exploding firework.

The large box on the right is basically just the action window where you can see whatever it is you’ve coded so doesn’t need masses of information – I will draw your attention to the red dot (stop button) and the green flag (go button) as well as the mini tool bar containing an arrow (to select things), a stamper (to copy and paste code), scissors (to cut code) and two tools which will enlarge or shrink your sprite – I’m hoping they are fairly self explanatory so I won’t go into too much detail here!

The left hand column lets you select what type of code you want to build – you can see I am currently in the ‘motion’ section which allows me to select what movements I want my sprite to make – below are the control, sensing, looks and sound menus just so you get an idea of what you can do.

Screen Shot 2014-07-18 at 16.41.44     Screen Shot 2014-07-18 at 16.43.38    Screen Shot 2014-07-18 at 16.43.25     Screen Shot 2014-07-18 at 16.43.31

You’ll notice that some of the blocks have drop down menus – you can adjust what things do once you’ve dropped them into the coding section and can even embed them within each other.

When you are ready to start coding you simply drag the blocks into the code window and you’re good to go.

So let’s look in detail at the code window in the middle – it is from here that you can manipulate things – whether it be the sprite or the background. Starting with the sprite, you have several options from the outset:

Screen Shot 2014-07-18 at 16.52.25

Firstly in the top left you can either set it so that the sprite can rotate 360 degrees, flip horizontally or always face the same way. You can rename your sprite in the box next to it and export you sprite (if you’ve drawn a picture you want to keep safe or share). Below this you have “Scripts”, “Costumes” and “Sounds”. The Scripts tabs is where you input your code so that is fairly self explanatory, but the Costumes tab allows you to have a sprite which changes it’s appearance completely when a certain action is completed; the classic Scratch example is that there are two pictures of a cat, one with it’s left leg forward, one with it’s right leg forward, by switching between these two pictures you give the cat the appearance of walking. The code you would input would be along the lines of “When flag clicked, switch to costume 1, wait 1 second, switch to costume 2 wait 1 second” and then contain it in a repeat or forever loop (found in the actions tab)…..I realise I could’ve shown that sequence visually, with another screen shot, but it’s key that you start thinking in terms of what you are actually asking the computer to do in order to help understand how coding works.

Finally, the sounds tab allows you to import, or even record your own sounds that can be coded to occur when specific actions happen to the sprite.

I’ve only really Scratch-ed the surface here (get it…), but I just wanted to let you know how simple and effective this software is, once you get your head around it.

My next post will be about the Scratch resources supplied by code club and over the summer I really want to get to grips with GPIO Scratch on the Raspberry Pi, so you can probably guess that I am a big fan of this software. Please, feel free to email me if you want some tips and advice, but please bear in mind I’ve only really got to grips with Scratch since Spring 2014 so I may not always be able to help.


Digital Literacy vs Computing vs ICT

So, instead of ICT (Information and Communication Technology) or Microsoft Office for beginners, as most of us knew it as, we have this new beast called Computing and Digital Literacy.

The basic idea is that Computing should count as a science and be given the same emphasis and importance whereas Digital Literacy should be ‘picked up along the way’. Before I discuss how I view this polarisation, let’s explain what this new heading means in simple terms:

Computing: Being able to understand basic algorithms (the new buzz word – it simply means a set of instructions), beginning to understand that computers and technology work from a set of instructions and that these instructions are called code. To understand and use block-based visual algorithmic software such as Scratch, Lego Mindstorm NXT etc. To understand that programming codes are written in different coding languages such as Python, Ruby, HTML etc

Digital Literacy: Being able to navigate and use a computer for a purpose e.g. to create a document or a presentation, to use the Internet for a purpose or to search for information. To understand that information on the Internet is not necessarily correct. To understand the importance of staying safe on the Internet (cyber safety).

At one point someone suggested to me that digital literacy should just be taught as part of English lessons or science lessons, or just at some point during the day – this was clearly put forward by someone who doesn’t understand just how much pressure is already placed on the English teachers to ensure that children are using capital letters, full stops, semi colons, onomatopoeia, metaphors, smilies and correctly deciphering complex ‘comprehension’ tasks. There is no time to slot digital literacy into other lessons so, unless it can be separately timetabled (in an ideal world), it has to be included in computing lessons.

So, with this in mind, what do we need to teach the children?

The main thing I’m going to be talking about in this blog is the computing side of the curriculum since that’s the bit that sounds the most scary, but here are a few bits & bobs about the digital literacy stuff.

I think that it is important that children understand that, while Microsoft Word is a useful way to produce a document and is very widely recognised as it is used globally by a lot of companies, other good software is available – I usually spend a lesson comparing Word with Pages on the Mac and with Google Documents (with the added bonus of being linked to their Google accounts so they can work on documents collaboratively). What we’ve established is that Word is the easiest platform to create a simple, elegant, written document; Pages is the best way to make a document which is a bit more interesting (especially with all the templates provided) and Google Docs, while not providing as much usability, is the easiest to save and the best way to work collaboratively. What you’re effectively teaching then, is the importance of selecting the appropriate tool for what you want to do.

There are some great pieces of software out there and it is useful to spend a lesson or two looking at them so that we don’t get lost in the coding and computing aspects. I spent half a term combining photo editing in iPhoto with using Comic Life so that Year 3 then had two sets of skills they could apply to any subject whenever they wanted to (we linked it up with science and they created comic strips about healthy eating, both taking and editing their own pictures before transferring them into Comic Life itself). The children also then picked up how to transfer their photos to their Google Drive and how to drag them to their desktop – it wasn’t taught explicitly, I just showed them once and those that figured it out went round and helped the ones who weren’t sure.

And I guess there you see the most important skill I’ve been teaching in my Digital Literacy lessons – having a go and helping each other. Learning useful skills and not being afraid to try for yourself. You may find I keep coming back to that….