Swift Playgrounds

It’s about time Apple joined the Coding Revolution – with Raspberry Pi, code.org and Google running projects for years, it was only a matter of time before something was released. And boy is it a good one… with glossy graphics and slick tutorials, Swift Playgrounds has certainly hit the ground running as a way to teach coding concepts to pupils on an iPad. However, it’s not without faults, but then nothing is, so let’s take a look.

A few weeks ago, I visited Apple HQ in London along with a few CAS Master Teachers and various CAS reps and teachers. As it turned out, the majority of attendees were primary school teachers, which brings us to the first flaw in the Swift Playgrounds roll-out. The first thing we were told about it was that it was primarily made for Year 7 pupils and older and this becomes clear when you work through activities as the vocabulary is very dense and would certainly lose many younger pupils. However, the look and feel of the app is very primary-friendly which is why most of the secondary school teachers hadn’t shown an interest, assuming it was ‘not for them’. Indeed, a primary ex-colleague of mine was recently shown Swift Playgrounds and after about ten minutes, decided it would be the perfect way to teach KS2 coding, unaware of its secondary-school target audience. When you spend some time playing through and looking at it, however, you begin to realise that it is indeed best suited to KS3, particularly because of the skills it is highlighting and teaching.

So, you can see very easily just how much effort Apple have put into Swift Playgrounds and how determined they are to make it a useful classroom tool. Not only is there a wealth of content that is easy to download, there are accompanying iBooks full of Keynote presentations, information, progress charts and comparisons to the CSTA standards. Information is made as clear as possible and it is quite fun to play the games. You can explore the current playground challenge by rotating, zooming, changing angle etc. Code is presented in text boxes with lines and phrases of Swift pre-written in them, and it is still drag and drop so that pupils become familiar with the language without having to write it by themselves. This makes coding and debugging easier when they are ready to move on to independent coding. You are also able to select a different character and alter the speed at which your code is run, which adds an element of personalisation.

img_0003   img_0004You can see here the interface for downloading lessons and a selection of the different types of lesson, including one for Hour of Code. There are some interesting resources that are worth exploring as all of them are slick and well made.


The first tutorial is called ‘Learn to Code 1’ and it talks you through using the interface from the beginning. img_0005img_0006

At the start of the game, you are limited to a few commands, but as you move through you are offered more commands and, in the second section, you are shown how to create your own commands, or functions.

img_0007

Now, one thing that was picked up on the training that I attended was that the US curriculum for Computer Science places more emphasis on explaining functions than on the word algorithm, which is different to the UK curriculum, where algorithm is considered a core word for coding and function is a later skill to learn. It is worth bearing this in mind as Swift Playground is geared towards the US curriculum. However, this isn’t necessarily a bad thing.

Let’s take a look at the code needed for ‘Four Stash Sweep’, which is approximately halfway through Learn to Code 1, with my solution to the problem included.

My solution is certainly not the most elegant, but it does demonstrate the complexity of some of the easy tasks, I can’t imagine doing this with primary-age pupils without a lot of support – I’ve had to write three functions to make my code more efficient as well as understanding ‘for i in range’ as a loop. Don’t get me wrong, I’m not complaining about the content, but it does make it clear that Apple are right to pitch this as a KS3 resource in spite of it looking like something for the juniors. It is definitely teaching text-based coding concepts, even if you are dragging the blocks of code into place.

A bigger problem lies in its running speed. When I tested it at Apple, it worked really smoothly, everything was simple and easy to use, but of course we were using brand new iPads. In contrast, when I used it at home on an iPad mini 2, it was slow and frustrating at times. The iPad mini 2 is the minimum specification device required to use Swift Playgrounds, along with the iPad Air, meaning that some early-adopting schools are already feeling excluded unless they upgrade their iPads. Perhaps those schools should consider upgrading them, but it is upsetting when there’s no budget to do so.

So, what next?

Apple are marketing Swift Playgrounds as a way to get to grips with Swift, their open-source language which allows users to create apps and content for iOS and macOS. This is very appealing to schools and young people because, let’s face it, who doesn’t want to be the next app-store millionaire. Making learning goal-orientated makes it instantly more fun and so to present to pupils that they could eventually make a real-life app will certainly inspire them to get more interested in learning to code. The fact that when you use Xcode to write Swift, you can use a playground to test your code, is deliberate to draw a link between Swift Playgrounds and the more ‘real’ Xcode environment and is a clever move by Apple, albeit one that confused existing users as to which playground was which. Swift works across multiple systems, including Linux and therefore Raspbian and I look forward to hearing about some Apple/Raspberry Pi crossovers in the future – perhaps we’ll finally see a RPi physical computing project which is controlled from an iPad!

Where does it fit?

My gut instinct is that Swift Playgrounds would be a great tool for a flipped learning environment. Pupils could work through the game in their own time and come to school armed with questions. Teachers could discuss concepts and offer their class challenges based on the skills they’ve practised at home while using the app. I think it is a great tool for KS3 programming and a lovely way to introduce pupils to the world of programming. I would worry about a whole class just sitting and plodding through in the classroom without the teacher bothering to be involved and it would far too tempting to just sit back and let them get on with it which is why I think it would be better suited to independent work outside of the classroom so that the teacher could focus on discussing the skills and developing them in the classroom.

My initial concern that it was a little too restrictive, like Discovery Coding, have been dispelled and I think there is plenty of opportunity for pupils to explore and create once they have learnt the most basic skills. There are some lovely, interesting resources already available (I recommend taking a look at ‘Drawing Sounds’ in the Swift Playgrounds ‘featured’ tab which you can download and play with) and I look forward to exploring and creating my own playgrounds once I’m more confident and perhaps after I’ve worked through all of the ‘Learn to Code’ modules.


Headlines about Computer Science

It’s been well over two years since the new computer science curriculum was introduced in the UK. Not that long ago, Roehampton University released its wonderful Annual Computing Education Report 2015 which says clearly, in black and white, that the numbers of pupils taking computing compared to those that took ICT are significantly lower now and, more importantly, the proportion of females has dropped. Newspapers jumped onto headlines exclaiming that we should have stuck with the old ICT curriculum, but that doesn’t address a number of significant issues.

So, let’s look at the lower number of students studying computer science compared to ICT. There are two things to consider here – when I was at school, ICT was seen as a bit of a joke subject: not one that was taken seriously in academic circles. It was a subject where you learnt to use Excel and create a blog, but it was a bit of a ‘soft’ subject. I suspect that a number of the pupils studying ICT were doing so because it didn’t require quite as much work as, say, French GCSE. Let’s compare that to Computer Science – the computer science curriculum is as difficult as learning a new language because you are actually expected to learn a new language, whether that be Python, Ruby or JavaScript; for the controlled assessment, you need to write some code. It is therefore not a soft subject by any measure.

The other thing to consider is that in a number of schools, there is a fear of failure – I have heard no end of stories from teachers who have been told in no uncertain terms that only the ‘top’ mathematicians are even allowed to consider computer science – no school wants to have a drop in the percent of grades A*-C that they can brag about (or whatever the numbers are in the new system). That immediately isolates around three quarters of the pupils. While I agree that there is some correlation between academia and computer science, it is also true that many pupils with dyslexia and ASD are excellent programmers who may not succeed in maths or English, but would, in contrast, perform exceedingly well in a Computer Science GCSE. Why should we exclude pupils that are interested just because they aren’t in the top set for maths? Surely it’s better that a pupil gets a low grade GCSE in CS than get no GCSEs at all?

By the way, I’m not criticising the schools for not being confident enough to allow everyone to study CS at GCSE level. It’s the system that forces them to fear failure and to force their pupils to conform because of that fear of failure. What, then, can we do to fix it?

On top of that, we have that issue of teacher training. Some of the best teachers in the UK for teaching the ICT curriculum are being pushed into teaching computer science without any knowledge of the necessary skills and there is no time nor funding for them to learn. Of course, they’re not going to want difficult or potentially weak children when they are not confident themselves!

Another issue is that the new GCSE assumes that pupils have been learning about algorithms since they were 4 years old and spent most of their school life learning about coding from an early age. Except that most of these pupils have probably learnt ‘a bit of HTML’ in a ‘coding lesson’ in year 9 and that’s about it; you have no idea how many secondary-aged pupils have told me that is their only experience of coding at school… How can we expect them to study at an advanced level when they’ve missed out the easy level? It takes both an excellent student and excellent teacher in order to achieve this feat, so is it any surprise that both numbers studying and grade expectations are dropping?

What about the fall in numbers of girls?

Well, I loved maths at school, but I know I was in a minority – I was the only girl to get an A* in maths GCSE and I was the only girl to study maths and further maths at A-level. Maths is a traditionally boy-heavy subject so if we’re limiting students to top-set maths then yes, that does exclude a lot of girls. However, that’s not the main problem with the subject, let’s be honest…

Computer science has a massive image problem – when you think about programmers, most people will imagine a middle-aged, over-weight man. When we talk about successful people in the industry, most people will list off “Steve Jobs, Bill Gates, Mark Zuckerberg”. So, where are the women? We are seriously lacking in positive female role models who demonstrate a passion for CS and programming even though evidence suggests that women write code equally as good, if not better, than their male counterparts. How many girls out there were put off as teenagers and never really got started – I know I was! I mean, how many schools even have a female computer science teacher?

This is something I’ve been saying in various circles for quite a while, but I really don’t know what the solution is – there are some great people out there like Carrie Anne Philbin from the Raspberry Pi Foundation and groups like the Stemettes and Django Girls, but is that enough? Young women like Yasmin Bey and Cerys Lock are flying the flag for young, female coders, but they’re still not well known enough outside of our community of already-super-enthusiastic people.

My heart feels like the key is in the teacher training. At the school I used to teach at, because of my enthusiasm for coding, my Code Club was 50:50 male:female. The girls were just as excited as the boys and so far three of them have come and talked very eloquently about their coding experiences at Wimbledon Jam. I should point out that only one of the three was a ‘top set’ mathematician, but that didn’t stop the others from being passionate and enthusiastic about learning to code. I was also given the freedom to tailor my curriculum to my resources and my pupils, something not always available to state schools where results are the only thing that matters and pupils are lost in the overwhelming need to achieve.

We need to support the people on the ground level, the teachers in the classroom, to help them to nourish and enthuse both male and female students and to help them to realise that computer science is for anyone who is interested and not just one subset of society.

This isn’t a criticism of the teachers as individuals: they’re doing the best they can. However, without the right training, without the right support, how can we expect teachers in the classroom to fill pupils with a sense of wonder and excitement for CS? Something has to change.

Just so we’re clear: I’m not a feminist. I’m not saying we should be holding girls-only events and pushing a female agenda even if the girls aren’t interested, I just wish that I’d been more supported as a teenager and felt more like coding was something that was socially acceptable for a girl to do, because who knows what might have happened if I had been! I just want us to encourage and foster interest in everyone to ensure that all students get a chance to be the best that they can be, no matter what their gender, ethnicity or background.

One final, happy note – take a look at the new Raspberry Pi Pioneers competition. That’s how you encourage people to get excited about computer science! I look forward to laughing at all of the (intentionally) funny entries and hope lots of young people have fun entering!

*please note this blog reflects my personal views and not those of any company that I represent.

Picademy Take 3 & 4

My picademy training was over two years ago now, but the experience remains one of the most inspiring two days of my life. As I’ve said so many times before, it literally changed my life. So, you can imagine my delight when I was invited to Glasgow Picademy, this time as a trainer.

I got to spend four days with two sets of trainees and see them go through the same life-changing experience I did.

So, the format for those of you who don’t already know – first of all attendees are talked through the benefit of Pi and then it’s straight to work learning some basics of physical computing. Unlike my picademy years ago, this time all of the cohort stayed in one room for their workshops.

I was really lucky that I got to run the first workshop as I love talking about the benefits of physical computing – I love demonstrating the power of Scratch and introducing some simple Python, especially to complete beginners.

Over the course of the day the attendees took part in workshops learning about Minecraft hacking, Sonic Pi, PiCamera and finishing up with a look at the fantastic Pimoroni Explorer Hat and some motors to make spiny things. The last challenge for the day was a mini hackathon challenge where they had 30 minutes to create something cool with their spiny motors and it was great fun seeing all that they had achieved.

As was normal, a few people felt a little overwhelmed and exhausted after the first day and it was our job to let them know that it was perfectly normal and that day 2 was their chance to become comfortable with their new skills. Just a note of reassurance here, we’ve all felt it, that feeling of never being able to understand or keep up. In fact, there were a few times that I felt it while helping out as a mentor. Don’t worry, we all feel like that!

The first day ended with a meal in a local restaurant for all attendees and mentors – just a chance to unwind and relax – the first week, we played a game of ‘learn everyone’s name’, but the second week I was determined to know them all by the end of the first session, much to everyone’s bewilderment.

So, day 2 – the challenge! Attendees are invited to work independently or in teams to make something using what they’ve learnt. Some people choose to develop their personal skills, while others are determined to come up with projects that can be used in their classrooms and both weeks I was overwhelmed by the super projects people came up with.

First, however, we were invited to talk to the attendees about something we were passionate about – in the case of James Robinson, this was Skycademy and HAB with pi, Marc Scott talked passionately about open source and Laura Sach talked about the importance of the Pi community. I was even given the chance to discuss my coding inititive, Coding Evening for teachers. It is always lovely to hear people talk about their passions and this is a lovely part of the training as it gives the attendees the opportunity to glean some insight into us as mentors and see another side of us.

Down to the projects. I’m afraid I can’t remember all of the projects, but I can say with absolute certainity that they were all superb and inspiring. In the first week, a whole table came together to create a giant group of mostly primary school teachers who were really keen to do some work with Scratch. They came up with an excellent ‘my Town’ activity that could be built in primary schools with KS2 pupils and then brought to younger pupils so that they could use the set up as a BeeBot or Sphero map. I particularly liked the way this team worked together to inspire and support each other.

Another project which stood out was a Minecraft music mat to help inspire children with learning difficulties to want to learn – I just loved that this project was so inclusive.

A pair of primary school teachers in the first week decided to independently use Python to create a Santa photo booth and what I liked about this was that they didn’t really know any Python before they started, but that didn’t stop them from giving it a go!

In the second week some teachers used Scratch to make a flood defense scheme to tie in with the Geography curriculum in Scotland which has a huge focus on environmental issues and projects and I was impressed with the cross curricular aspect of this.

Another impressive project was a back-to-basics Minecraft resources where pupils were given complete code to auto build a house in Minecraft and were then asked to identify where they could make changes in the code to alter the output. I loved this idea as I think really basic starting points for Python are few and far between and I would defintely like to see more from this project. Other Minecraft projects included a ‘yellow brick (gold block) road’ and a Hadouken Sense Hat control game.

Projects were really broad for the both groups and showed a lot of inspiration and excitement – from photographing twitter buttons to doorbells that check who is ringing them, all of the projects were well thought out and generally quite easy to apply to the classroom. I don’t think  anyone who has attended Picademy could deny the power of project based learning after spending time exploring Pi.

There were some hilarious moments over both sets of picademies, including some innuendo (mostly unintended), some incredible successes, some moments where, in spite of failure, we all had a good laugh and even some moments where I felt like I was able to contribute and help people with their code. I will add that, perhaps my favourite moment from the entire four days was when, at the end of the two days, I was asked by an attendee whether I would get an award “for being the most enthusiastic trainer” for the two days… I feel like I must have done *something* good to receive that response!

I really hope I get invited back to Picademy, as this was a fantastic experience and I can’t wait to see where they are going next in the country – fingers crossed there will be some more courses a bit further south in the future! Please keep an eye out for future Picademies and take the time to apply as this is an experience NOT to be missed!

Thanks, as always, to the Raspberry Pi Foundation for offering such amazing training and thank you too, to Google Garage for supporting them in bringing Picademy to locations they might otherwise not have been able to. Keep up the good work!


Little update… big one to come

It’s been an amazing summer and a fantastic start at pi-top – I can’t wait to blog about their new operating system and all the workshops we’ve been running!

I’m also looking forward to blogging about some great products and cool projects.

Finally, I’ve just attended picademy for the third time, this time as an instructor and I can’t wait to tell you all about the amazing experience I had.

So… keep your eyes peeled for some updates soon and hopefully I’ll see you all at Twickenham Coding Evening on the 10th November or at Wimbledon Jam on 13th November.

What next…

Over Christmas I made a decision. It was a tough decision to make, but the more I think about it, the more I realise it’s the right decision. I am leaving teaching.

When I was nine years old, I knew that I wanted to become a teacher, to inspire children to learn and to enjoy learning as much as I did. I worked hard and aimed straight for my goal, meaning I was already a qualified teacher before I turned 22. For two years I tried to get a job in Cornwall, my home county, before realising that there just weren’t teaching posts for young locals unless you were really lucky. Instead I supply taught until I was no longer allowed (Newly Qualified Teachers are limited to a maxium of 7 terms of supply without completing their NQT year). I learnt an awful lot going from one school to another; good things and bad things, but most of all, I learnt how to teach a lesson with no plans, no prior outcomes and to just come up with an inspirational and fun hour of learning.

I moved to London and taught for two terms in a state secondary school where children were streamed from the moment they entered the school, where the weakest children were considered ‘not able’ to be taught by secondary school teachers and instead were handed over to primary school teachers, especially employed to look after the ‘unit’ as it was known. When I joined, just before Christmas, my class were a nightmare of sullen, agressive and thoughtless children who had made a game of scaring off supply teachers for the prior five weeks (their previous teacher had walked out from stress). By May they were still difficult, but praise was coming in from across the school for their changed behaviour. The children felt like no one cared for them and so they stopped caring for their education and for each other. Even my unskilled management of the class made a huge difference because they finally felt like they belonged somewhere and had someone who cared about them. I had children who were proud of their siblings in prison, but who now wanted to stay in at lunch time to chat to me about the future; children from Somalia who didn’t know where they belonged and just wanted to feel safe; children whom no one had realised were incredibly intelligent and just needed the right push to help them to achieve. I was so proud of my class and how hard they were working, but when I tried to speak to their new year 8 class teachers, no one wanted to hear it. No one else in the school cared about these children in the same way I did, they just wanted to push them through the system and move on and I couldn’t face the thought of seeing those changed children reverting back to their old ways when they went back to having a teacher who didn’t care. Without a school to go to, I handed in my notice.

That was eight years ago… I got lucky when I left my old school, I applied for any job I could find and received an interview in a school in Putney, I hadn’t even realised it was an independent school when I sent in my CV and I nearly didn’t accept the position because I wasn’t sure I could face ‘abandoning’ the children who really needed it. There have been some hard times, some fun times, some wonderful times, some great friends, amazing lessons (and one or two terrible ones) and I have loved teaching such a fantastic bunch of children in the time I’ve been here, but I still have to leave teaching.

You see, there’s something they don’t tell you when they talk about teaching. Lot’s of people talk about the holidays being great, they talk about the paperwork being awful, the hours of marking, the pointless inset, the displays (oh God, the displays), but no one seems to mention the emotional strain of being a teacher. My teaching day starts before 8am as children start to arrive and, no matter how I’m feeling inside, I have to be energetic and smiling for all of those children, because my mood will affect their mood. I have to maintain that excitment and enthusiasm, even when teaching something I hate or something I know nothing about. I truly hate teaching drama lessons, but I can’t let children know that – we want them to be enthusiastic about learning so we have to be enthusiastic in return. I didn’t know anything about Victorian history three years ago, but I need to be an expert for every lesson I teach, even if that means spending my lunch break frantically researching about the Great Exhibition to pretend to be a fountain of all knowledge by the end of the day. I have to make my lessons exciting, otherwise I’m failing as a teacher, whether it be fractions, grammar or the story of Christmas, it all needs to be delivered in the right way.

And here’s the problem, maintaining that constant level of energy is slowly breaking me. I’ve spent two months this year sick with three successive chest infections and a mild flu. I love teaching, but some days I found struggling to drag myself out of bed in the morning. My enthusiasm is rapidly waning, not because of some government announcement, or change in the curriculum, but simply because I’ve worn myself out and working at this rate is not sustainable. I am determined to be a good teacher, I never want to be one of those teachers that just coasts along, delivers their lessons, but doesn’t inspire the children to find out more.

I say that as someone in a fantastic school, where I don’t have to stick to a swinging pendulum of a curriculum or listen to Nicky Morgan or Michael Gove or whichever career politician with no idea about what life in school is about wants to throw at my profession. I can snigger behind my hand when it’s declared that Roman numerals are more important than measuring angles and I can stand on the side in awe and horror while LEAs, the curriculum and Governors are abolished by the latest announcement that schools should all become academies. In short, I have it easy in my school, but I still can’t physically or emotionally keep going so how on earth do my state school counterparts still drag themselves out of bed every morning? This profession is so intensely emotionally and physically draining, it is no wonder so many people just give up.

So…what’s next for me? I’ve been really lucky, over the last few years I have found something that I am really, really passionate about and I have a new career goal. I am no longer satisfied just teaching a class of children about computing and coding, I am want to be able to teach lots of classes how to code and support teachers so that they can better teach computing and code. I want so much more than just teaching in one school and I am fortunate to have been given the opportunity to do so!

Way back in March, I was speaking to the lovely Jesse Lozano of pi-top and when I mentioned my plan, he very generously offered me a job. I was very pleased to be able to accept his offer, on the basis that it was a part-time role so that I could still focus on my own projects. I’m really excited that as education outreach champion for pi-top, I’ll be able to help them to deliver useful and exciting content for teachers as well as helping them to run workshops at events and support other teachers using pi-tops in their classroom. I’ve spoken to the a few members of the team and I can’t wait to get going and have the opportunity to work with such an amazing and fun bunch of people.

I think that the pi-top products, especially the CEED, have a lot of potential to be fantastic classroom tools because of their cheapness, ease of use and focus on all things code. In a primary school in particular, where space is limited, it makes life a lot easier to not have to worry about getting a separate monitor for your pi and storing bags and bags of cables. Added to this, the guys in the office are really keen to make sure that the software pre-loaded onto the pi-top is actually of a good quality and beneficial to teachers and they’re so keen to listen to what teachers actually want to ensure it’s the best it can be; I really hope I can help them achieve this goal!

But, I also mentioned my own projects…I’m still really keen to help as many schools as possible with their teaching of computing and coding and so I’m hoping to be able to head in to schools to run CPD sessions on how best to teach the new curriculum, or how to integrate computing with current set up. I’m doing some training with CEOP so that I can become a CEOP Ambassador to be able to deliver high quality eSafety training. I want to be able to offer bespoke workshops for children on coding, robotics, physical computing, or any other topic schools want me to demonstrate. I’m really pleased that Crossover Solutions are giving me the opportunity to work freelance for them as a consultant to make this all possible and I can’t wait to be able to travel around and meet more of you

Finally, I want to look at plan b for Coding Evenings – too often I’m asked by parents “How do I get started using a Raspberry Pi?” or “How can I do some coding with my child?” So the next step will be Coding Evenings for parents, which I’m hoping can be a pay-for event so that funds can be filtered back around to pay for “one drink free” inititives at the Coding Evenings for teachers. Perhaps a future plan c might be to look at Coding Evening for teenagers, but for now I want to develop the platform I already have.

So, if you’re currently working in a school who would like some help getting the most out of teaching computing and coding please, please get in touch:


CAS Conference 2016 – workshop links

I will do a proper write up soon, but for those who were in my workshop, here is a downloadable version of the two worksheets, plus a link to the prezi and links to the resources that I showed you!
Scratch workshop – Python

Scratch workshop – pi-top

Prezi – Scratch-ing the Surface of GPIO

pi-top

Pi-Stop (traffic lights)

Pimoroni Flotilla

CamJam EduKit 1 (plus free worksheets)

CamJam EduKit 3 (robotics kit – plus free worksheets)

Astro-Pi Sense Hat Kit (as sent to the ISS)

I think that was all of the things that I shared with you, but please let me know if there was anything else you wanted further information about!

Cat

Crumble Bot by Redfern Electronics

A few months ago, I donated ‘an afternoon of robot building’ to a charity auction and so this weekend I headed out to fulfil my promise.

Last month I tried out the CamJam Edukit, which I absolutely loved, but quickly realised wasn’t necessarily the right tool for using with 9 and 11 year olds so, on the recommendation of the wonderful Nic Hughes, I bought a Crumble Bot from Redfern Electronics.

cbb_image_04-600x600

The robot is based around the crumble controller, which is a simple programmable board with simple inputs and outputs.

Basic-Connections-595x275.png

Photo credit redfernelectronics.co.uk

The kit comes with an easy to follow booklet which shows very clearly how to build the robot.

Screen Shot 2016-05-15 at 08.38.52.png

We started off by fitting the Crumble to the base unit – it required a bit of force to push the controller into the base, but with the help of big brother Rupert, Annabelle was able to push it into place.

IMG_9145.JPG

The boys handled screwing bolts through the motors and it was only after they’d screwed both pieces in that we realised that they had fitted them to the motor the wrong way around! As you can see from the diagram, it’s quite important that you put the screws in the right way around, otherwise you can’t attach the wheels later!!

Screen Shot 2016-05-15 at 08.38.58.png
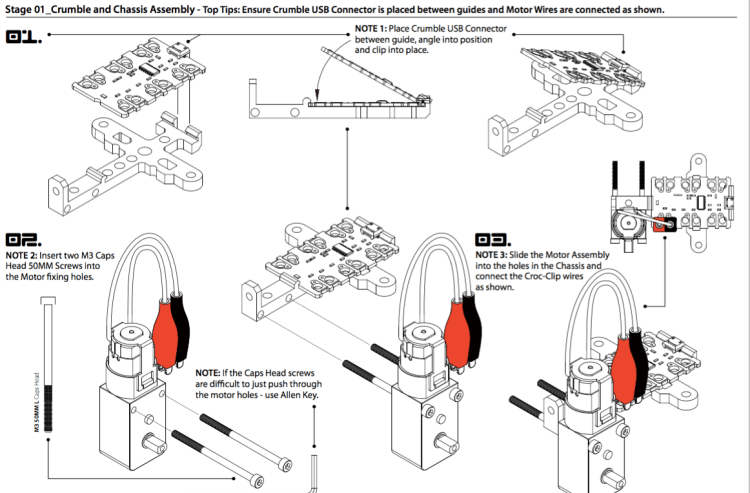
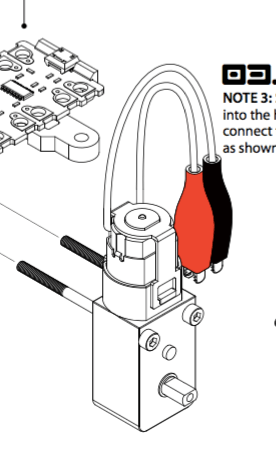
Alerted to the boys desire to do everything backwards, we kept a careful eye and had to check carefully to ensure that Alexi had put the screw through the base the right way around.

Screen Shot 2016-05-15 at 08.41.20.png

Luckily, we caught it before any further mistakes were made.

The children worked really hard and built their robot in around forty five minutes – we were really impressed with how easy to follow the directions were and how quickly we had a working robot.

Our next job was to work out the Crumble interface. Redfern have created a ‘Scratch-like’ interface to make programming the bot easy and we were really pleased when, after a few seconds, we had a robot moving across the floor.

Screen Shot 2016-05-14 at 21.49.24.png

We’d had some great conversations so far about circuits and the need to ground the motors, we discussed how the controller is used to control the robot and now we were ready to get the robot to draw some shapes on the floor. Once we added a loop in, we discovered there were only two ways to stop the programme running. Either we unclipped a crocodile clip from the battery pack, which wasn’t easy unless we’d removed the slippery protection from the clip and risked a short circuit, or we pushed the stop button on the computer interface, but this only worked while the bot was plugged into the computer. Perhaps a future step for us would be to put in a button which ‘stopped’ the code as it was quite a pain to stop it running otherwise (saying that, it was pretty funny watching Sia dive across the floor and grabbing the robot while frantically pulling out crocodile clips).

Screen Shot 2016-05-15 at 08.51.06.png
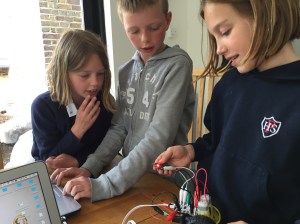
The children worked hard to figure out how to make a square on the floor and had great fun making the bot dance, but there was one more piece of kit in the box. We had one neo pixel ‘Sparkle‘. With no instructions for getting the Sparkle working, we searched the internet to find some instructions. Our vain hope that we’d be able to just drag a ‘set sparkle’ block didn’t work out.

Screen Shot 2016-05-15 at 08.55.14.pngWe tried setting it up in various different ways and, from looking at some diagrams in blog posts, we realised that the arrows on the Sparkle were misleading and didn’t actually tell us where to clip the crocodile clips, but were to let users know how to set up the Sparkles in series.

Screen Shot 2016-05-15 at 09.05.54

I would’ve liked there to be clearer information about how to clip in the the Sparkle and how to programme it as it took us a long time to figure out – the information is there, but it wasn’t as easy for us to find as I would’ve liked.

We eventually found some code which included the block ‘let ‘t’ = 0′ and so we tried dropping a block in the beginning of our code and this seemed to do the trick, so now our robot both drew a square and had a red sparkley light. Screen Shot 2016-05-14 at 21.48.30IMG_9150

I’ve now been told by Redfern that we shouldn’t have needed the variable block to get the sparkle working so who knows what we were doing wrong!

One other issue we struggled with was that the Sparkle tended to flicker between colours for no apparent reason – to be honest, the children actually quite liked this; it wasn’t intentional and is perhaps a hardware fault that could be improved on, but nothing to worry about.

I admit to a moment of indulgence at this point – I wanted to see if I could make the Sparkle phase through different colours and so I tried the following code:

Screen Shot 2016-05-14 at 21.48.01.png
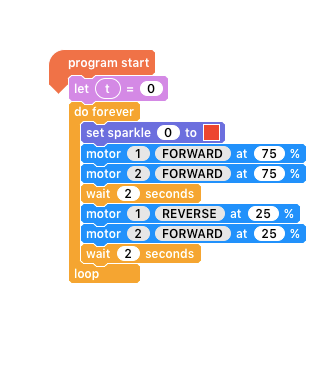
I was pretty pleased when the bot went through blues, pinks and reds as it drew its square and I’d love to have time to further develop this code!

Anyway, we had a super afternoon building our Crumble Bot – the children were pleased with their robot and had just as much fun coming up with code for it as they did building it in the first place. I would thoroughly recommend this for primary school teachers as the robot could easily be dismantled and rebuilt and it was great fun to do – it really emphasised the importance of physical computing to make coding relevent and fun. The Scratch-like interface for programming the robot was mostly intuitive and easy to use (although the sparkle code needs work) and the children quickly managed to achieve their goals with very little input from me. I’ve seen some wonderful projects where teachers have used this robot as a base, but have built and designed their own chassis as a DT project. It is a great way to get started with robot building in the primary school and then, once the children are more confident they can move on to more challenging projects such as the CamJam kit.

I’m really excited to see this robot in the classroom so I hope you give it a go!

Thank you to the parents of the children involved for allowing me to use photos of their children in this post.

Upcoming Talks and Events

I’m very excited to be taking part in some events coming up where I will speaking and running workshops etc.

First up is Coding Evening in Twickenham next week – the lovely Stokes and Moncreiff pub are hosting yet another Coding Evening for us on Thursday 19th May in their upstairs function room. The folks from Pi Top are hoping to pop over and we’ll have lots of cool ideas to help teach computing so come along to find out and get some inspiration for teaching computing whether you’re a complete novice or an experienced programmer!

Next up is the annual CAS conference in Birmingham on Saturday 18th June, I’m going to be running a workshop to show teachers how to use Scratch GPIO on the Raspberry Pi – the conference is looking to be a fantastic event with loads of exciting talks and workshops running.

On Sunday 26th June, along with Albert Hickey of Egham Jam, I’m helping to launch Wimbledon Raspberry Jam – we’re aiming to make the event as family friendly as possible, with talks about Primary Coding from me, Astro Pi from Richard Hayler and various others, including a very special talk from 10 year old Izzy, who is going to share why she finds coding so interesting and exciting. We’re also going to be running Minecraft workshops and Scratch workshops to show off some cool physical computing ideas.

On Saturday 23rd July (two days before my birthday), I’ll be travelling down to my home county of Cornwall to launch the first Truro Raspberry Jam at the Truro campus of Truro and Penwith College. We will also be hoping to run talks, workshops and show & tell tables – I’m really excited as the Cornish tech community are eager to share their excellent work. The Truro Jam is being launched in collaboration with Cornwall Tech Jam, Software Cornwall, Truro and Penwith College and various other groups!

Pycon UK is moving venue this year and will be held in Cardiff City Hall from Thursday 15th to Monday 19th September and I’m hoping to be there helping out with the Education Track on Friday again. The previous two years have been incredibly good fun and great for networking and getting ideas for teaching Python in schools.

In early November, I will hopefully be helping out at Mozfest and there are various other events coming up that I hope to be involved with too so keep an eye out for announcements on twitter about other events where you can find me talking and helping out.

There are also several upcoming events that I wish I could be a part of, but am unavailable due to various other commitments so I want to mention them and urge you all to go along if you can!

First up, Grace Owolade and her son Femi are hosting their third autism and tourettes friendly Raspberry Jam in South London on Saturday 14th May. Unfortunately I volunteered an afternoon of robot building to a charity auction and so am fulfilling my promise on Saturday so I can’t go, but I really hope to be able to support Grace and Femi more in the future as I think what they are doing is so important!

On Friday 17th June, the education team at Roehampton University is hosting a Festival of Computing with lots of great workshops and talks – it should be a great day! I was lucky enough to be invited to talk, but it’s on a school day so I can’t attend!

Finally, on 11th June, the amazing Carrie Anne Philbin is hosting a CAS #include Diversity & Inclusion in Computing Education Conference in Manchester. I really wish I could attend this event as I’m sure it will be super, but I’m fulfilling yet another aucition promise and taking some children for a picnic in the park. Make sure you go if you can!

So, lots to look forward to in the coming months! Very excited and hope to see some of you at some of the upcoming events.


CamJam EduKit 3 – part 2

First of all I’d like to thank you all for the positive responses to my first blog about the CamJam EduKit 3 – loads of you commented, retweeted and even offered some really helpful advice. Yesterday, Louise came around and we embarked on phase two of the robot build.

On Wednesday I hosted a Coding Evening in Twickenham and quite a few attendees brought along their robots. Richard Hayler brought his CamJam robot which was controlled by a bluetooth keyboard – what impressed me most is that Richard had written his code and then set up the pi so that it automatically started running on boot up. I was also very impressed with the Crumble Bot kit that Nic Hughes brought along, controlled by an interface based on Scratch so very easy to use – I’d be interested in trying one out for myself as it looked like a great introduction to robot building for children.

The first thing I wanted to do was to make my code run on start up, so I quickly checked the code I’d written last weekend to make the bot move forward, turn left and right and backwards. I’d been sent a blog post from Raspberry Pi Spy, as I’d been warned by Alex Eames from RasPi.Tv that auto booting on Jessie could be a little complicated. I was rather proud of myself for figuring out that because my python file was in a folder called EduKitRobotics, I needed to include that in the code I was typing in, meaning that instead of the website of example of /home/pi/myscript.py, I needed to use /home/pi/EduKitRobotics/4-driving.py, however, what I failed to do was to use capital letters for any of the commands in square brackets in the config file. I also made one massive mistake in the terminal code that I was typing in meaning that nothing worked.

IMG_8477IMG_8478

You can imagine the fear when I saw the words ‘dead’ in the instructions, but luckily it was Alex to the rescue as he spotted that I’d made a typo in the ‘ExecStart’ command – my python filename was missed off – I’d obviously been in such a hurry to get it typed that instead of typing:

/EduKitRobotics/4-driving.py

I’d just written

EduKitRobotics.py

A simple, but silly error, which caused my code to fail. The next attempt to run everything, with the capital letters all in place and the correct file information typed up, we were ready to test whether our code launched on start up.Screen Shot 2016-03-27 at 17.59.37.png

We were quite excited when, after quite a wait, our robot set off wobbling across the carpet, as seen here, however, we couldn’t help but notice that the wheels were starting to come off the side of the box. Fortunately, it was Stuart to the rescue as he found a piece of wood, cut it to size and stuck it to the bottom to support the motors!

My next task was to attempt the code for following a line – at this point, I decided it was safest to just use the 4-driving.py saved code for all of my future work to save having to redo my boot up code, so I carefully copied and pasted the original code into a new file and began work on the next bit of Python.

I should probably point out that I got a fair bit of stick last week from both Stuart and Louise for the awkward position I was sat in to type my code and so this week I borrowed a monitor so that I could be a bit more comfortable. I also decided that to input my code I’d use my Pi 3 because it had enough USB slots to have a mouse and keyboard attached, and then I could simply pull out the memory card and put it in the A+ when we wanted to use it in the robot. This also meant that our cables could be permanently attached to the pi, without worrying about maneuvering them to attach the pi to a monitor (yes I still need to figure out how to VNC into the pi). IMG_9929So, with the line following code ready to go, we put our robot back onto the floor, plugged in the trusty Anker power supply and set it off. We were hugely disappointed when nothing happened, until I realised that the diagram for wiring the line sensor showed the sensor facing up, whereas we had installed it facing down and therefore the cables were the wrong way around!

With a slight fear that we’d damaged the sensors by having it back to front, we switched the cables and ran the code again – this time it worked, but we had a slight issue with the robot going backwards and so I had to go and tweak a tiny bit of code to get it sorted and then we were able to watch excitedly as our robot wiggled it’s way along a line. We did have one further problem, the bit of wood we’d added to help support the wheels had made our robot a little heavier and that meant it couldn’t manage to move on the big, fluffy carpet in the living room so we had to relocate to the tiled kitchen, with its black, granite tiles. Not an ideal location for testing for black lines, but as long as we kept the robot on bits of paper, it worked ok!

Our final bit of Python was the code to get the front sensors working so that our robot could detect distance. Using a bit of careful cutting and pasting from the previous code I had typed up, I was able to get the robot moving fairly quickly – you can see it bouncing around the kitchen here. I should note at this point that it took quite a long time from plugging in the battery to the code actually starting to run and we were often close to giving up when it started to run. I’d estimate it was between 30-60 seconds from battery in to code running, which can be a long time when you’re worried that it doesn’t work!

The next step of our build involved Louise spending a lot of time with spray paint and an entire tube of super glue to decorate the robot!

One slight issue with all the decoration is that it made the robot quite heavy, as you can see here, but it was so funny that we didn’t really mind!

Perhaps jealous of our achievement, Stuart got out his remote controlled car, and then started looking suspiciously at the sensors and muttering that he could attach them to the car and automate it… we decided it was safest to hide our robot from his tinkering hands, but watch this space to see if he does end up using a CamJam Kit with his car.

So, as you can see, we had a fantastic couple of days building our robots – considering neither of us is particularly techy, we were pleased with our achievements both in terms of the building and the coding. I still don’t think this is a class activity, but definitely one to do with a small group of enthusiastc children as it was so much fun.

CamJam EduKit 3 – Part 1

This weekend I decided it was time to try out the rather exciting CamJam EduKit 3 – Robotics

Screen Shot 2016-03-20 at 18.09.54

I admit that I’ve been avoiding having a go because I was terrified of everything going wrong, so this weekend I called my friend and we embarked on our first robot building exercise.

So…in the kit are all the parts you need to build a robot – once again, it looks very complex and scary, but it’s not that difficult once you get going. My friend and I decided to use the box as our chassis, as suggested in the instructions available here.

IMG_6807-1.jpeg

The first thing we needed to do (after setting up Python and running Hello World) was to attach the motors. We realised straight away that we need to put some holes into our box so that we could feed the cables through and so, being girlie girls, we got the drill out of the cupboard and started making holes in the case. It was at this point that I realised that this may not be a project for the primary school classroom, unless you want to pre-punch the holes or have children waving drills around…although, a strong leather punch may be a better option.

So, using the diagram below from the worksheet, we stuck our bits on with the provided double sided tape…and quickly realised that this led to a stunted angular robot because the front wheel was so much lower than the back one so we had to start again and rethink our motor position.

Screen Shot 2016-03-22 at 10.07.49Screen Shot 2016-03-22 at 10.23.12

After a bit more time with the drill, we’d repositioned the wheel motors on the side of the bot and carefully carved out some extra holes to fit the line sensor and ultrasonic sensor (Louise wanted to make sure it looked pretty).Take a look at the two pictures above and see if you can spot the difference between the photo and the diagram…at this point we were a little bit confused as the motors appear to be the other way around on the photo compared to the diagram and so we decided to follow the photo’s direction and worry about it later.

IMG_8407     IMG_8410

I put Louise in charge of following the wiring instructions, and as a complete novice, she found it fairly easy to put together following the sheet, we even learned how to tell the difference between the resistors by reading the bands (after a moment of panic about how we could tell which was which). The worksheets so far are really clear and easy to follow.

Screen Shot 2016-03-22 at 10.20.07

We hadn’t really done any coding yet, because we were so eager to get the build done, which meant that we didn’t really know if any of it worked!

IMG_3806IMG_4239-1IMG_3070IMG_4144-1

We had a bit of an issue when we started coding, because the instructions ask that you make sure you’re using the newest version of Raspbian and even tells you how to check, but in order for us to check we ended up running an update to the pi, and then installing a package from instructions I found online and THEN we could check whether we had Jessie or Wheezy (it turned out we had Wheezy installed so I had to find a memory card that already had Jessie).

So, I could finally start typing my code to check the motors were properly set up. The instructions talk you through the Python code, which requires no extra library installs, but did require a lot of typing lines and lines of code to set up which pins do what.

# CamJam EduKit 3 - Robotics
# Worksheet 3 - Motor Test Code
import RPi.GPIO as GPIO # Import the GPIO Library
import time # Import the Time library
# Set the GPIO modes
GPIO.setmode(GPIO.BCM)
GPIO.setwarnings(False)
# Set the GPIO Pin mode
GPIO.setup(7, GPIO.OUT)
GPIO.setup(8, GPIO.OUT)
GPIO.setup(9, GPIO.OUT)
GPIO.setup(10, GPIO.OUT)
# Turn all motors off
GPIO.output(7, 0)
GPIO.output(8, 0)
GPIO.output(9, 0)
GPIO.output(10, 0)
# Turn the right motor forwards
GPIO.output(9, 0)
GPIO.output(10, 1)
# Turn the left motor forwards
GPIO.output(7, 0)
GPIO.output(8, 1)
# Wait for 1 second
time.sleep(1)
# Reset the GPIO pins (turns off motors too)
GPIO.cleanup()

I’m actually really pleased because I could follow this code quite easily so, while it was a bit boring to type, but I knew what I was doing. Now, do you remember when I mentioned earlier that we were a bit confused by which way around to put the motors. It turns out we should’ve put them the other way around because when we tested the code the wheels went backwards, but the instructions were very clear and so we were quickly able to make some alterations to make it go forwards – pins 9 and 10 controlled the right motor and so if turning on just pin 10 made it go backwards then turning on just pin 9 must make it go forwards. We changed pin 7 and 8 too and everything worked perfectly.

Check it out here.

Now, if you watch the video, you may notice the slightly awkward position of the Pi and the bot – I confess that I don’t know how to use a pi ‘headlessly’ i.e. without a monitor attached and so I currently have no way of getting it running without having it attached via HDMI to a monitor or screen – this is not an ideal set up so before we finish the build we need to find out how to VNC into the pi from my MacBook. I’m also really keen to try and figure out how to do this code in Scratch so hopefully when I write up part two I can let you know successes or failures for that.

So, conclusions from our experience so far. Firstly, this is not one to attempt with a class unless you are willing to either pre-make the bases, let them use a drill or try out a punch, but you could get children to bring their own base materials from home, making it clear that they would need to punch holes in it to run wiring through. I like that there is room to fail or be independent in your design – you can put your motors where you want and just hope that it works, but if it doesn’t, so what, you can just move them and try somewhere else. The build itself is dead easy, BUT the code is very long and tedious so it takes a while to type and even longer to debug. If you don’t know how to dial in, it’s also a problem so there are lots of specific skills needed. Saying that, my friend and I had an absolutely fantastic time on Saturday building our robot and I can’t wait to spend more time on it this weekend, so it is a great activity! I can honestly say that I haven’t had that much fun in ages; my friend Louise went home telling her flatmates about how amazing the Raspberry Pi is and how cool robot building is. I’m really excited about spending more time on the project and I think that this is a brilliant way to get people exciting about the things we can do once we know how to code. I can’t help but that once the code is re-written using Ben Nuttall’s GPIOZero (a simplified Python library, designed to make Python code even easier when using the GPIO pins) or with Scratch this will become more accessible to everyone, but for now it would take a brave person to get this out for a classroom activity.

Watch out for part two of this blog within the next week.

PS I LOVE ROBOTS AND I LOVE THIS KIT