2015 – the year of new stuff

I’ve not posted for a while – things have been busy – my father passed away in October and so I have been dealing with that, but as time has moved on and a new term has started I feel ready to dive back in head first.

Anyway, that’s no excuse – my goal for this year was to write up a guide to the new curriculum and I have so far failed miserably.

So, the last few weeks have been interesting – before Christmas I visited my first CAS Hub event in Hammersmith – it was mostly independent schools like my own and included a chat about how people are getting on as well as a demo of a java script game based Code Kingdoms (more on that later). It was good to see what people were doing, but I ended up arriving late (only by 15 minutes) and felt like I missed out on a lot of the early chat.

I had also attended a Code Club meet up in central London right at the beginning of the academic year and between the two events I decided it was time I started organising my own meet up. My plan was simple, I wanted to keep things informal, I wanted to get lots of teachers there and I wanted to make sure there were things to try out. I’m not a great fan of sticking to timetables so I decided not to plan anything formal for my event and so next Thursday (22nd Jan 2015) I will be hosting a coding meet up in the Stokes and Moncreiff pub in Twickenham – I’m hoping to get lots of teachers to come along (although I’m only up to about 16 so far) as well as trying to encourage some Code Club volunteers to head over. If you’re interested in coming along please sign up here.

At the end of last year, I also volunteered to talk about Raspberry Pi in the primary school at BETT 2015 on the Raspberry Pi stand along with a fellow Picademy alumni, Tom Sale, who is a leading practictioner when it comes to the new curriculum and is well known for helping to organise a big primary school coding event in Blackpool, Hackpool.  We will be talking on the Pi stand at 12.30pm on Friday 23rd and then we have also been invited to sit on a panel at 2.15pm with Clive Beale in the BETT Futures arena to talk about coding in the primary school; next week is looking set to be an exciting week.

While surfing Twitter this week, two very exciting things have come up that I think are important to share: Firstly, CamJam and Raspberry Pi are hosting a third birthday event in Cambridge 28th Feb/1st March – this is looking like it will be a great event for anyone interested in using the Pi, whether it be teachers, parents, professionals or children and it’s less than £10 for a full weekend pass (the day activities are completely free for under 16s). I’m planning on heading along to the Saturday events because I think it will be another great networking opportunity and to get some ideas for how to use the Pi in school (trust me, the best way to be inspired about how to use the Raspberry Pi is to find out how other people are using it). Further details here.

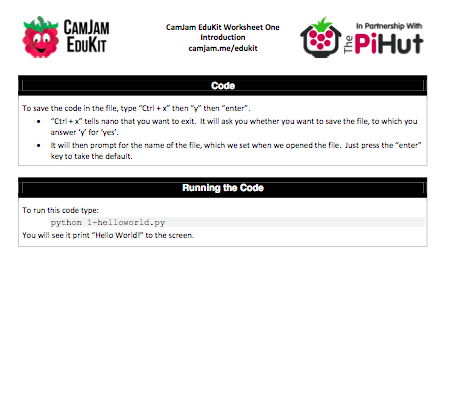
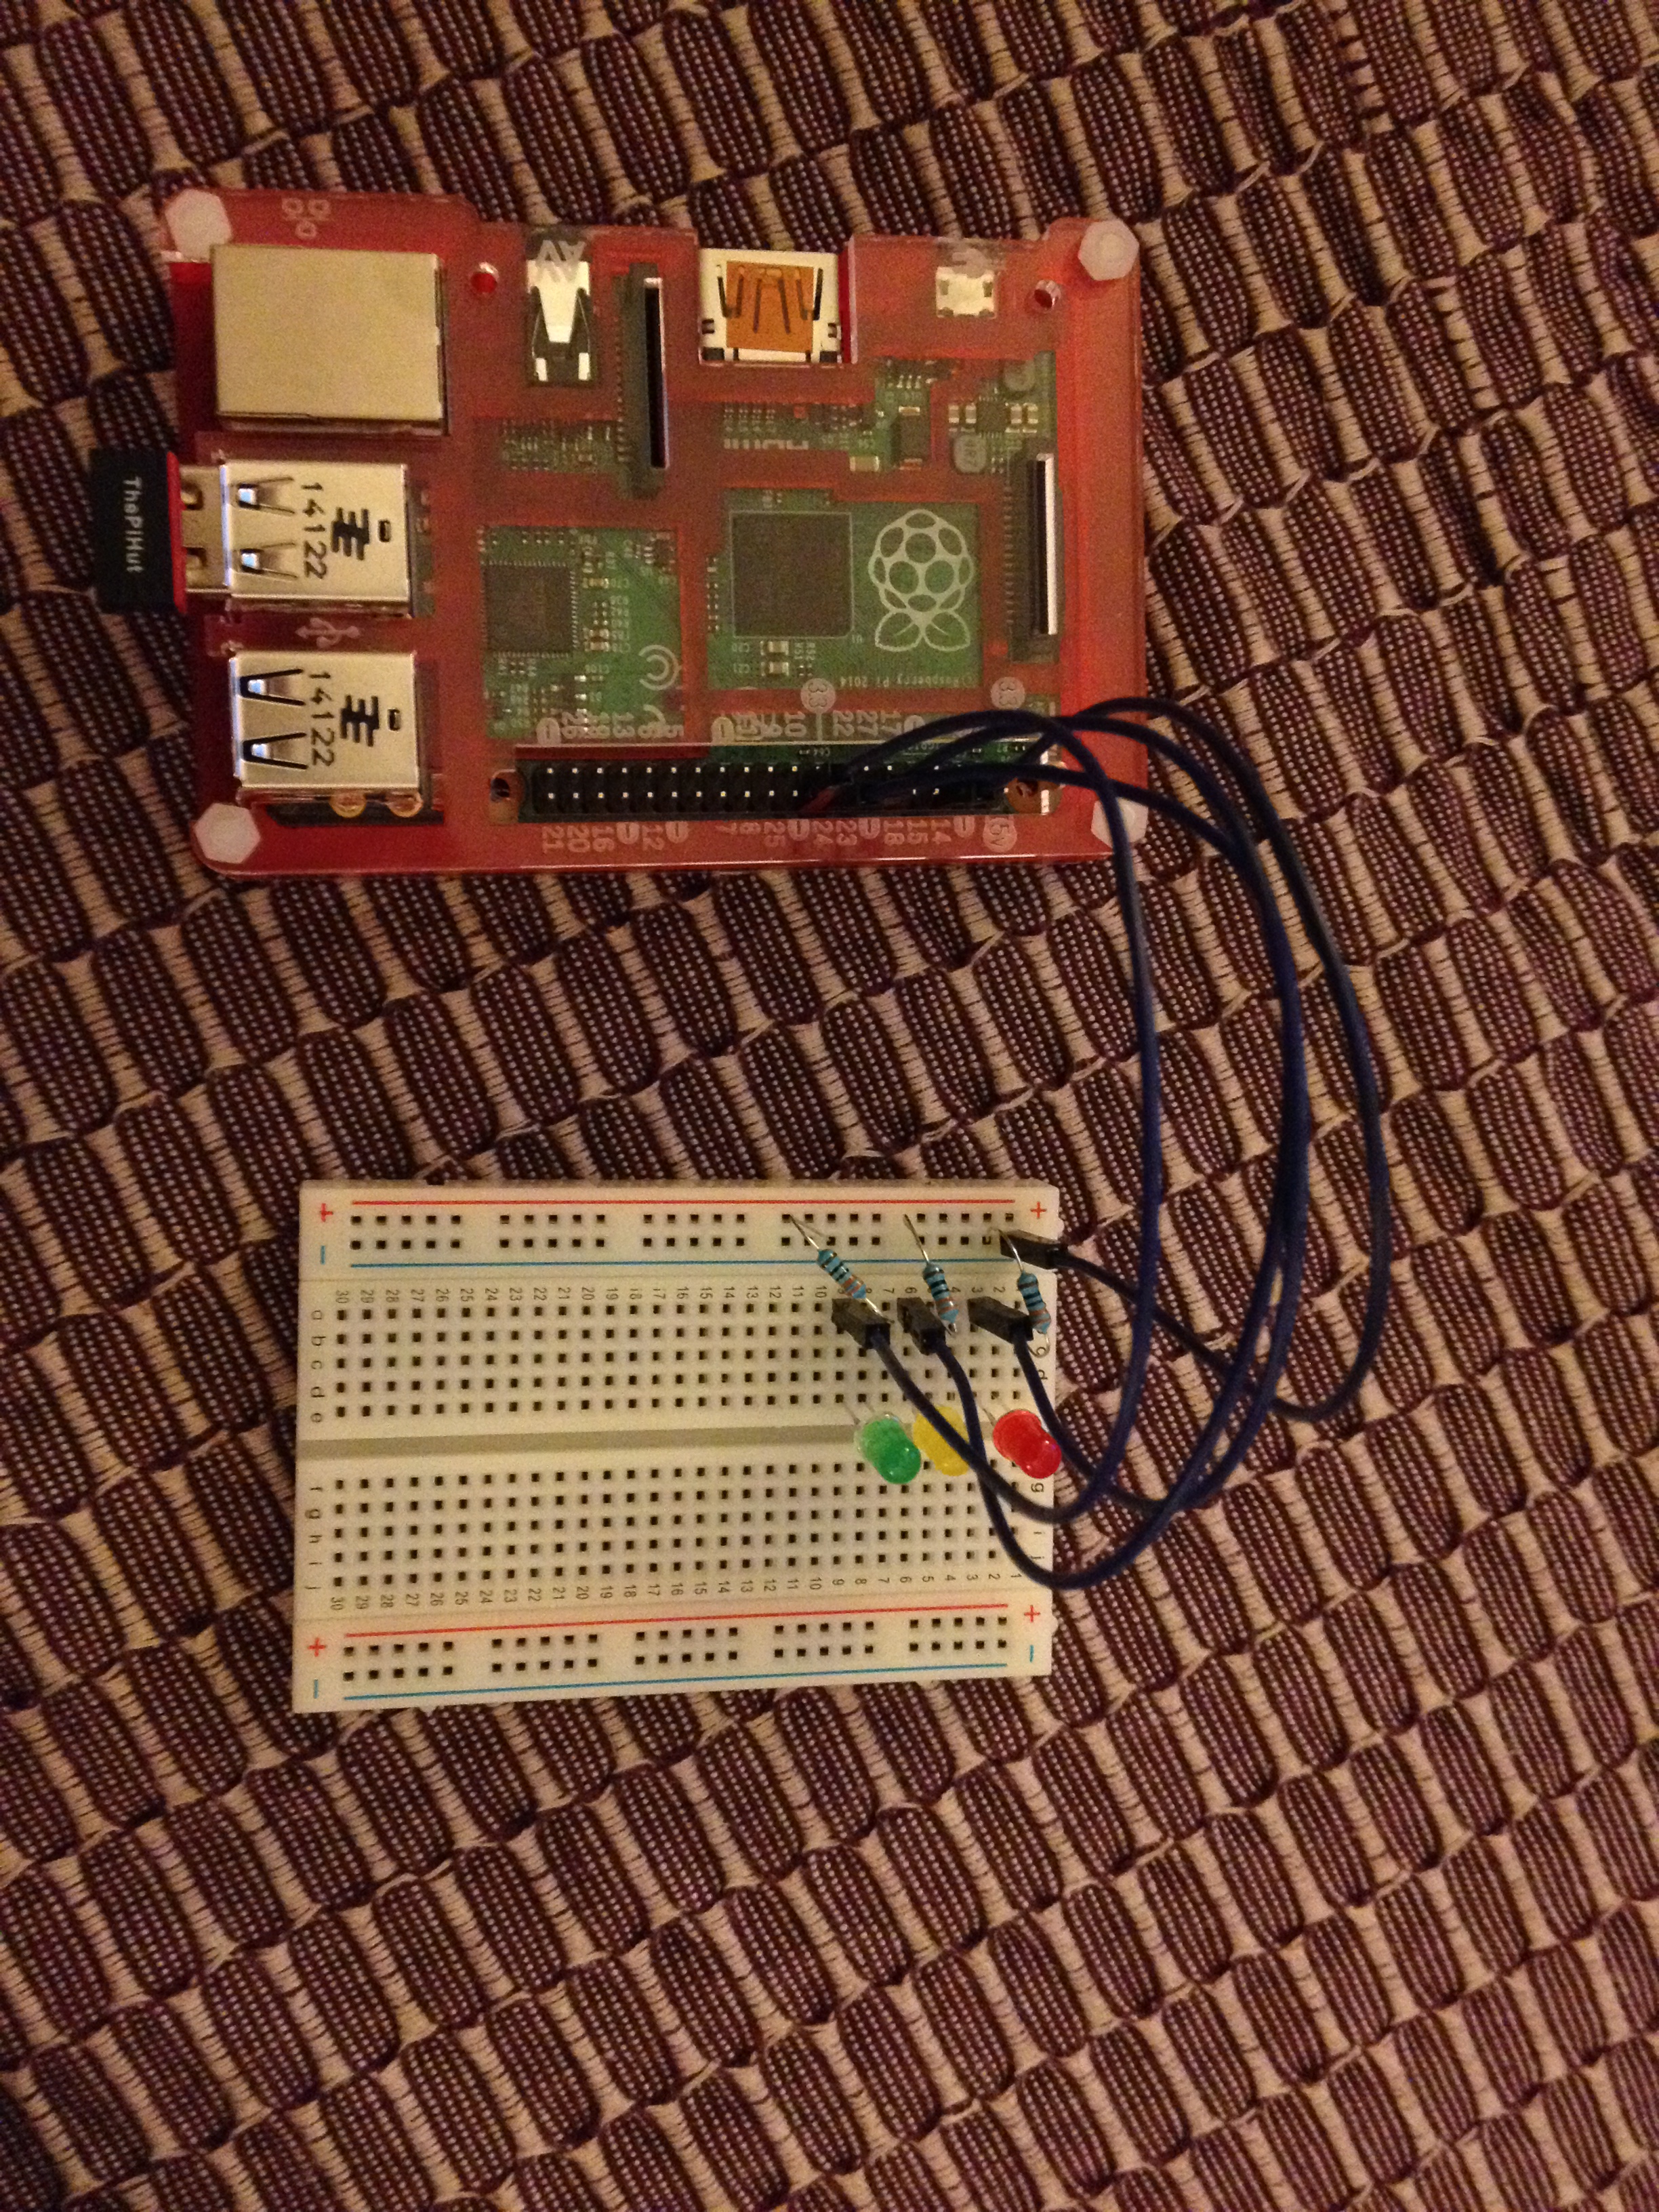
The second thing I saw this morning was a lovely little kickstarter from the guys at Pimoroni called Flotilla. This looks like a perfect bit of kit for any primary school teacher as the cross curricular links are immense. The idea is simple – a USB plug and play hub with an awful lot of sensors that can be controlled with varying levels of coding difficulty starting off with simple recipe cards, to flowcharts, to Scratch, Python and beyond. It can be controlled from a computer or a tablet. My hand slipped when I was making a pledge and I’ve ended up putting down enough to be able to get a mega treasure chest so as soon as this is released I’ll be blogging about how it works. It’s nearly achieved half it’s funding in a few hours so there is no doubt it will be fully funded before too long! Looking at it, it should be great for linking coding to science and I have a feeling there will be ways to link it to other subjects too!

So, I’m declaring 2015 the year of new stuff as I continue to find new and exciting ways to encourage people to enjoy the new coding curriculum….

One final anecdote for you, however, a pair of excellent teachers came to me this week to ask why I was making them teach coding, they wanted to know if they could just go back to teaching ‘word and stuff’ *facepalm* luckily for me, they saw sense, but just goes to show how deeply the old microsoft curriculum has been ingrained into teaching!!

Google Classrooms

<edit 18/01/2015> So, I can’t help but wonder if Google have been reading my blog – I think that all of the issues I had with Google Classroom have now been corrected in the October update </edit>

About two or three years ago I managed to persuade our network manager to set us up with Google Apps for Education (with the bribe that I would manage the accounts if he did the initial setup). Over the last two years we have successfully integrated the use of email across KS2 (in fact, today I have been inundated with emails from Year 3 who are just getting to grips with sending mail to class groups). As a school, most of the staff and children really appreciate the fact that you can send an email to someone which is safe and secure, in a closed network, but you can discuss something that you might not be confident enough to talk about in person. So far, we’ve only had two or three bullying issues and they were very quickly dealt with by the simple means of checking inboxes, outboxes and deleted items (it is amazing how terrifying it can be to a 9 year old to realise that a teacher can see their emails). We have also used google drive with varying success, which has proven to be popular with upper KS2, in particular the idea of having a multi-authored document goes down really well.

So, this term we decided to try the new google classrooms setup, to coincide with a new BYOD (bring your own device) arrangement in Year 5.

The school had made the decision to use myHomework as a way of communicating with parents as it allows simple communication between staff and anyone who signs up to the ‘class’, but we also decided not to share work via this platform since the children were taught in sets for maths and English and, since anyone can sign up to any class, we didn’t want them to be comparing work. This meant there wasn’t a simple way of distributing e-copies of homework except for by emailing them out and so, along with one of the literacy teachers, I decided to give Google Classrooms a go.

My first impression was that it was a nice looking interface – setting up classes was easy to do and you could only invite children from your own domain, which is a nice touch, but meant I couldn’t use my personal account as a test and instead had to create a test user in our Google Apps domain- no big deal of course, but useful to note.

Screen Shot 2014-09-26 at 17.20.11

The next step was to populate the class, which can be done by searching through all of the users in the domain – I had already sorted all of the children into class ‘groups’ in the admin panel of google apps so I was disappointed not to be able to bulk import a whole class or group at a time, instead having to add them all individually.

Screen Shot 2014-09-26 at 17.33.19  Screen Shot 2014-09-26 at 17.33.32Screen Shot 2014-09-26 at 17.34.15You will see from the above picture that until a child accepts their invite they are shown as ‘invited’ and greyed out so you can see if your class are members of the classroom or not.

I assumed that each child would receive an email inviting to join the classroom, but that was not the case and instead I had to send them all a link to join Google Classrooms at which point they were informed that they could join my class – this seems a little roundabout and it would be a significant improvement if a link could be sent out as soon as a child is added to a class, without the need for them to separately log in to Google Classrooms.

So when a child is invited to a Google Classroom and then log in to their classrooms account they will see the following:

Screen Shot 2014-09-26 at 17.38.54

When your class is all set up and the children have added themselves you can then start to set them assignments – for my maths classes, generally this is just a case of uploading a worksheet that they can download a copy of if they need to, but there are two other ways of uploading documents too. The first is that you upload a document and ‘make a copy for each student’

Screen Shot 2014-09-26 at 17.25.56

Which is a rather clever idea, especially as it is fully integrated with Google Drive. What it means is that in the teacher’s Drive, a folder is created called “Classroom” with sub folders for each class, when an assignment is uploaded it is placed in the appropriate folder. What is particularly nice about the ‘make a copy for each student’ option is that it creates a copy in the students Google Drive and when they submit it, you get a copy of their version in your drive with their name appended; THEN, even better, you can make some adjustments or highlight some changes or just add a few comments and then send it back to them for further corrections. You can also grade the paper or give it a mark out of whatever you choose before returning it. One of our literacy teachers used this to great effect as a starter for a lesson – he sent the children an un-punctuated piece of text, asked them to quickly alter it on their iPads and submit it to him there and then. He then sent it back with a few comments and adjustments and asked them to make these as homework. Instant, constructive feedback for him and for the children.

So, when the teacher creates an assignment, the pupils get a message in their screen (one of my children described it as being a bit like Facebook for homework). The pupil then accesses the document, makes their changes and submits it to the teacher.

Screen Shot 2014-09-26 at 17.41.06 

The teacher can see on their live feed how many children have submitted their work or not.

Screen Shot 2014-09-26 at 17.41.33

If they then access the submitted files they can grade and comment on the work:

Screen Shot 2014-09-26 at 17.41.44 Screen Shot 2014-09-26 at 17.42.33

You will see that I have changed the out of grade to twenty and given a score of 3 out of 20 as well as writing a private comment. I can then return the work with feedback:

Screen Shot 2014-09-26 at 17.42.46

Here is what the pupil then receives (you will notice there is an option to add a comment and resubmit the work):

Screen Shot 2014-09-26 at 17.42.59

I’ve also included some shots of my Drive so you can see how the files appear in your drive:

Screen Shot 2014-09-27 at 09.24.59

Screen Shot 2014-09-27 at 09.25.15         Screen Shot 2014-09-27 at 09.25.32

You will see in the third picture that the submitted file is in the teacher’s folder with their name both in the ‘created by’ column and on the end of the title of the document.

So, overall I am really impressed with Google Classrooms, it’s proven itself to be a useful classroom tool for a range of subjects – I could imagine it being used in literacy lessons and I know that one of our teachers has used it to do some Geography work using Google Sheets. The children really like using it because it is a bit like Facebook and they can write comments in the stream. It is also an attractive and free way to store e-copies of worksheets so that you can eliminate the classic homework excuse “I left my homework in my desk” and, more importantly, I really love the integration with drive that means that work is effortlessly stored and saved.

Considering the ease of use and the fact that so many schools already use Google Apps for Education instead of a VLE, this project is a natural progression and I would definitely recommend using it.

Museum of London Computing/History Consultation Evening

On Wednesday evening I visited the Museum of London after seeing an advert in my weekly CAS email offering a £40 amazon voucher to spend two hours looking at a new educational resource. They specifically requested history and/or computing teachers and were hoping for a range of both primary and secondary teachers. From what I could see, they ended up with mostly primary teachers, but it was interesting nevertheless.

First we were asked to blindly try out the software which showed us an artefact and asked us to slot it into a historical period and then decide on a category in to which it fitted e.g. Painting or money. Rather rapidly we got frustrated with lack of feedback (were we right or wrong) and were confused about the purpose of the ‘game’.

It was only after testing it that we were told what the purpose of the activity was, you see the museum has over 9000 artefacts which have been arbitrarily labelled and catalogued on paper, but needed to be properly organised for the modern world. Their idea was to crowd source the data and specifically get schools involved. They wanted us to think about the educational purpose and value of the software and ways to improve it before they create a working version for schools. Most of the objects had information about the date an object was made, but that wouldn’t necessarily automatically sort it into the historical period e.g. Roman or Victorian. The system would work by ‘verifying’ data after a certain amount of people had all agreed on the period and the type of object.

There were a few aesthetic tweaks we would make, but the key focus was on its value to the primary curriculum. A good idea would be to use it as a starter for a topic so the children would maybe categorise 20 items then the teacher would be able to focus in on the ones that refer to a specific historical period and discuss those items in context. A lot of teachers wanted to be able to only select objects from a certain period, but due to the nature of the project that just wouldn’t be possible and would defeat the object of the whole project. I like the idea of it being a quick history topic, but what was more interesting to me was when one of the computing teachers in the room mentioned its value towards teaching databases in upper KS2.

Now, I can honestly say that I hate teaching databases and have been seriously considering dropping it by the wayside, but it is part of the new curriculum and so needs to be thought about. My big issue with databases are that they are quite an abstract concept for your average 9 year old to understand. Even in the context of ‘solving a crime’ using the Whodunnit? app, it all seems very false and needless, however, the more I thought about the Museum of London’s project, the more I began to realise it’s usefulness for teaching this topic. Not only would children contribute to a real life database in a meaningful way, if the museum then implemented a search function which linked to their data, they could see exactly how a database works and how they have helped.

There is still a lot of work to be done before this becomes a useful tool, but as I left the museum on Wednesday I realised just how much I was looking forward to this being a working project and, in particular, using it to help teach the purpose of databases. They are hoping to create a video to explain the topic and a rewards system depending on how many objects you have submitted that have been verified and it all sounds very interesting.

I really look forward to seeing where they take this project as I genuinely think it has value for teaching the databases part of the new computing curriculum as well as being an interesting tool to use in history lessons.

Testing…testing…1…2…3

So, with the start of the new term, I’ve been able to try out some of the resources I’ve mentioned with the children I teach.

I’ll start with ActiveLit, the text based adventure writing programme I discovered via Twitter. Using the game I’d created over the summer, I set the Year 6 children the task of solving my game. The first lesson was full of frustrated and grumpy children who couldn’t understand how to get past the first room, however, as soon as they realised that you had to use very basic vocabulary, you could almost see the light bulb switching on in each child and by the time the lesson was over they were buzzing with excitement. In the second lesson, I let the children finish my game and look at another, as well as make some notes on the sort of language they needed and the basic structure of the game. By this point they were really excited and so I encouraged the class to begin planning their first room. I’ve only had one further lesson and I am pleased to say that all of the children, either individually or in pairs, have begun to code their first room in their adventures and they are all really excited to share each other’s ideas. One of my least confident children enthusiastically asked me if he could carry on his game at home.

In my Code Club last week I thought it would be a good idea to try out the CamJam EduKit resources and unfortunately was not as successful – I think I expected too much as I handed the children the booklet and asked them to work through, but I was also a little disappointed that neither of the two groups I set trialling it even managed to read the instruction for how to log in to the Pi. The overwhelming sentiments was that there were too many words on the page for them, which I hadn’t noticed when I trialled the sheets myself, but I’d like to try them again, this time with a bit more input and with my more able students giving it a go.

I’ve also been taking a look at Sonic Pi, another Raspberry Pi resource created by Sam Aaron to teach children how to create music using code. I’m so horribly unmusical that I haven’t been able to write a full review, but the newest version comes with a simple tutorial and I hope to look at it properly soon. Sonic Pi is available on both Mac and Raspberry Pi and there are a few lovely worksheets popping up – I found one on CAS (sorry that I don’t have a link), which I’ve proposed to be taught in Year 4 as part of a digital music module instead of just making loops in Garageband and the non specialist teacher who is meant to be teaching it was really enthusiastic. On our current scheme of work, that won’t be until Spring term so watch this space to see how it goes.

Pycon UK 2014

Apologies for the lack of blog – as always, the new term has been somewhat busy.

This weekend I headed to Coventry for Pycon UK, a convention for users of Python. The lovely Nicholas Tollervay organised a two day education track; one day for teachers, one day for children. I was lucky enough to attend and found it to be a great opportunity for both teaching ideas and networking.

The key point from my perspective was how to introduce Python, as a text based coding language, to the primary school curriculum and whether it is necessary to move on from Scratch before secondary school.

The new computing guideline recommends that you start to look at a secondary coding language beyond Scratch in KS3 and the obvious choice is Python as it is a fairly user friendly and accessible language. It was generally felt that the most able children in upper KS2 could definitely handle Python, but more importantly, that Python could be used to introduce some more complex computational thinking to all children in KS2.

So how can we introduce a language that many of us don’t understand to children?

The first point is that it is important that you get yourself a basic knowledge of Python as a language – looking at the CamJam EduKit sheets or working through Codecademy is a great place to start. I’m only on about 30%, but I feel like I have a good enough working understanding to begin teaching it.

The key skills we felt were important for the children to understand were basic vocabulary and debugging. The concept of debugging was a popular one since the children need to be wary of capital letters, punctuation errors and spelling mistakes, much the same as in any other subject. Suggestions for teaching this involved writing a line of code incorrectly in both Python and/or Scratch and then asking the children to identify why it doesn’t work or else playing a game created by Alan O’Donohoe (techno teacher, podcaster and founder of Raspberry Jams) called Sabotage, whereby children write their lines of code then deliberately put errors in for their opponents to find.

In terms of vocabulary their was a feeling that children need to understand the following terms:

Variables

Control Structures

Functions/Procedures

Loops

I don’t know about you, but I’m already confused – fortunately the clever people at Cambridge University have been developing a Raspberry Pi based game called Pyland that they hope will help introduce Python to children aged 10-12 and so would be a perfect bridge between Year 6 and 7. They are hoping that it will be ready to beta test in schools early next year and if you’re interested it’s worth tweeting lead developer Alex Bradbury who will add you to his list of testers.

Another lovely idea was to present a piece of code in Scratch and then compare it to the same function written in Python, a number of people have said these resources are available on CAS so I guess I need to get hunting, but I’ve been unsuccessful so far.

So, what else did I learn from Pycon? I was reminded that Raspberry Pi have a great selection of resources readily available on their website, I met some lovely coders and developers and had the opportunity to make some great contacts that were willing to help and offer advice to help me teacher coding as best as I can.

All round a lovely weekend and I would definitely recommend that you go if you get the opportunity (and I haven’t even talked about the dancing Nao robots).

Raspberry Pi – Minecraft

I don’t know about you, but for my Year 5s, Minecraft is a way of life – for the past 3 or 4 years I’ve seen it grow and grow in popularity to the extent that it’s no longer something cool to talk about, it is beyond cool, it’s just assumed that everyone knows what it is and plays it. So, when I first bought my Raspberry Pis, I remember enthusiastically telling the children that “you can use Minecraft on it”, which was greeted by some mumbling responses and one child declaring that it was too slow on the Pi.

When I went to Picademy I learnt the significance of Minecraft on the Pi – it’s not to play Minecraft, which can be done on any laptop, desktop, Xbox or even on Android & IOS devices, it’s to use lines of code to hack Minecraft and change the rules of the game.

The Minecraft section of our course was run by Craig Richardson, a former teacher with a passion for both Minecraft and the Raspberry Pi who is employed by the Raspberry Pi Foundation to pass on that enthusiasm to other teachers and children. He has very kindly shared his resources here and he even explains how to install Minecraft Pi Edition on your Raspberry Pi.

So, for those of you who don’t know, Minecraft is a simple, block based game where people can build, using blocks, houses and castles and boats and whatever their imagination requires. You can set up the game to be very simple i.e. resources are readily available, there are no bad guys etc or you can play so that you need to collect resources in order to make your buildings sustainable etc. It has never appealed to me in the slightest, but I really enjoyed using Craig’s hacks to explore the game and would consider looking at it again. One of the first things we were told when loading the Pi version of Minecraft is that the current version doesn’t work very well in full screen so don’t try to make your window full screen.

The first thing Craig asked us to do was to build a house. We discovered how to select different coloured blocks and built houses of varying quality (mine ended up being bright pink with a glass roof – it was hideous!). We also found out that to move our character (called Steve), we used the WASD keys, then the mouse clicks to play and select blocks. Once we’d built our houses, we were then asked to record the co ordinates of a point somewhere inside of it and then walk our character to another random point on the map.

In order to release the mouse from Minecraft, we had to press the tab key and then we could open Idle in order to type in some lines of code. Thankfully, Craig has helpfully created worksheets to go through all of this information including some extra tasks like creating a Minecraft folder in LXTerminal.

Screen Shot 2014-08-21 at 12.32.38 Screen Shot 2014-08-21 at 12.32.15

As with the CamJam sheets I looked at last week, I’m really impressed with the amount of detail in these workbooks – not only are the lines of code explained, there is some information on the back about what you’ve learned in terms of the language of code and an extension task. The first booklet explains everything from switching the Pi on to getting your code running and has a helpful big red box to remind you about using tab to release the mouse. From there you move on to making  flowers follow your character, then building a house in one go, using chat, freezing water and making a ‘block fighter’ mini game.

So let’s see how simple the instructions are to follow.

My first problem was that I couldn’t really remember how to control Steve in Minecraft so I had to sit for a while and press buttons until things happened – left click allowed you to smash things (either with your sword or without), right click allowed you to place blocks. Pressing E came up with a list of different materials that you can use to build. Pressing the space bar allowed you to jump and double pressing it allowed you to fly (double pressing a second time made you drop to the floor). I could also press ‘esc’ to alter the viewpoint from first person to third person (some of our group felt that the first person view made them feel a bit seasick). So I built myself a house…..

IMG_5556

In order to teleport into my house I need to make a note of the co ordinates of it – in the top left hand corner, in white, are the xyz co ordinates of my front door (which need to be rounded to the nearest whole number for the code to work). I actually want to teleport to the middle of the room so I’m going to use -30, 8 and -32 in IDLE an then save my code.

I hit upon a problem when I tried to run my code – I kept getting the error “no module named mcpi.minecraft” …a bit of fiddling and I discovered where I’d gone wrong – in my infinite wisdom, I’d saved my teleport file to completely the wrong place (I found a directory called .Minecraft and thought that sounded right), it turns out it’s important to save the file to the Documents folder called minecraft. So, now my code works I can move my character away from my house, tab out of Minecraft and then hit f5 in the Idle window and….tada, I’m back in my house!

Magic!

IMG_7774

I’ve mastered booklet 1, with one minor hiccup, so let’s take a look at number 2, the flower path – my goal is create a path of flowers that follow me around the map.

Screen Shot 2014-08-21 at 15.32.02

Maybe I’m just a bit more confident now, but this took me a few minutes to type in and, apart from accidentally missing the letter e off of Minecraft in one line of code, I had no problems….until I decided I wanted to get the flowers to stop following me, then I had a massive problem – luckily I’d written down that in order to stop the code you had to press ‘ctrl + c’ in the Python Shell window, otherwise I know I would have found myself getting really annoyed.

The extension task for this activity suggests changing the block variable value so that instead of flowers, you get melons, gold, water or even lava following you – I remember on our course we managed to make exploding dynamite follow us, which was highly amusing, albeit very destructive. Using this page I decided to try getting some different things to follow me – it did not like it when I tried to get Emeralds to follow me and I got a recurring ‘fail’ message across my screen and when I tried 319 for a ‘raw pork chop’ I ended up with a trail of wooden signs following me, so I guess it’s a bit of a case of trial and error (I did successfully manage to make running water appear under my feet using the codes).

Anyway, this is another fun Minecraft hack from Craig.

Just a final point – as I went to quit Minecraft, I suddenly got really upset that all my hard work building my house would go to waste, so I did a little research – by pressing escape I could quit the game, but the next time I loaded up Minecraft, instead of clicking on ‘create a new world’, I could click on my existing world and go back there -it seems that Minecraft Pi autosaves. While doing my research I learned that the version of Minecraft for the Raspberry Pi is a much more simple version compared to the full version so does not have the same scope for multiplayer etc, but it’s still good fun!

Personally, while Minecraft is a bit lost on me, I think that these 6 booklets are a fantastic way to get children interested in word based coding over block based because it’s not just typing in lines of code to make a message pop up, it’s typing in lines of code to ‘hack’ a game that they already play – it has huge mass appeal and I can’t wait to show the children I teach these booklets and let them have a go!

One thing I really appreciated about using IDLE over the LXTerminal is that it preempts the code you are typing and a little yellow box started hovering over my current line of code, suggesting what the rest of the line might need to look like. I also found that IDLE automatically put in line indents, which can be one of the reason lines of code fails.

So, if you teach children who are interested in Minecraft, I would thoroughly recommend taking a serious look at Craig’s worksheets and giving Minecraft hacking on your Raspberry Pi a go!!

Espresso Coding

We’ve been using Espresso in my school for a number of years for subjects like history and English. I’m sure most schools have one of their servers installed somewhere in a forgotten corner. As a maths and ICT teacher, I’ve never really found much use for it, but occasionally I’ve given it a cursory glance. Earlier this year we were sent information about a free trial of Espresso Coding, which I decided to take a look at with my Year 3 and 4 children in order to introduce some of the concepts of code and to see if it’s any good. We’ve been using it in the classroom since January 2014. Espresso have said that they will start charging from October 31st 2014 (I can’t seem to find the price so far). It seems to operate completely online and be managed separately from the main bulk of Espresso (which requires you hosting a server within your school that they manage externally), however, this may change once they start charging. I’d be interested to see what they charge since Scratch and  Scratch Jr are comparable products, but are both completely free.

So, what do you get for your money? Espresso have created 2 units of work for year groups 1-6 and in each unit they aim to teach a develop various different coding skills. They’ve also introduced a ‘starter unit’ so that you can recap the information from previous years without going all the way back to the beginning of Espresso Coding.

Screen Shot 2014-07-19 at 19.20.25

Each unit is broken down into 6 lessons and each lesson also has 6 parts to it, which does make the software fairly idiot-proof, however, it does mean that there is an awful lot of repetition. Your more capable children could quite easily jump straight to Step 6 of a lesson and find no difficulty with the task.

Screen Shot 2014-08-15 at 15.05.30 Each activity is introduced with a simple video explaining what you need to do and how you need to drag your blocks into place to achieve the expected outcome. This means that Espresso Coding is really good for those teachers who are less confident with coding and the language of coding.

After watching the video you are taken to your ‘game’ in the My Design tab – here is the start screen for Unit 4a -> Lesson 5 -> Healthy Eating (lesson 6 is always a ‘design your own game’ option using the new skills you have just learnt).

Screen Shot 2014-07-19 at 19.36.45

This basically shows you the four images you can animate – in Scratch any image that you can manipulate and get to move is referred to as a sprite, which is the term I now tend to use to differentiate between something that moves and something that is in the background so that when children move on to Scratch they understand the term.

While you are creating your code, you can get back to the game screen by clicking on the “My Design Tab” and to play your game, you need to hit “Run”.

So, when you enter the My Code tab you have a selection of control bars and a load of pictures that you can drag into place to write your code:

Screen Shot 2014-07-19 at 19.44.31       Screen Shot 2014-07-19 at 19.44.10

By dragging the blocks into place you should end up with something like this:

Screen Shot 2014-07-19 at 19.39.02Screen Shot 2014-07-19 at 19.38.33

Let’s take the very bottom line of ‘code’; if I were to read that to the children I would read it as “If dog hits burger, burger gets randomly placed somewhere new and score goes up by -10”. As you can see, it’s all very simple and self explanatory.

You can see how strange it would look if I put the blocks the wrong way round – the sprite (or noun, or object or whatever you want to call it) must come before the instruction – it’s a bit like writing a sentence in literacy (cross curricular, cross curricular!!!!)

Screen Shot 2014-07-19 at 19.37.29

The whole code basically makes the dog move in straight lines constantly in whatever direction key you press (I tend to subtly hint that WASD is a great key combination, but that’s because I’m a big geek). When the dog hits one of the items of food the score, or variable, either goes up or down and then the food item randomly relocates.

So, what I’ve found is that the children really enjoy using Espresso Coding – probably because they can’t really go wrong so it’s nice and safe. They really like the big cartoon-like characters and the simple instructions, however, I found that after a while they began to get a bit bored with being constrained to one skill per unit. They started to skip lessons out and jump straight to either lesson 5 or the ‘create your own game’ section and just have a play. In particular the boys were really eager to move on and so I tended to use Espresso as a starting point for coding, but once they children were more comfortable I moved them on to the Scratch cards (more info here) and even onto the Code Club resources because that allowed them more opportunities to be independent learners.

Espresso have worked hard to try to make their resource cross curricular and have even got a few lessons designed to work on a iPad and have a good awareness that many KS1 and 2 teachers really don’t have a clue about coding, however, it is a limited application that can get a bit tedious and works best as a way to introduce skills before moving on to more complicated resources.

I would recommend Espresso Coding as a useful stepping stone, although that does depend entirely on how much they plan on charging for the product. Personally, I haven’t renewed my contract for Espresso Coding because, while you are teaching children coding concepts, there is no independence or opportunity to really use the coding skills. It is a little bit too much of a ‘paint by numbers’ approach to teaching coding and I prefer using Scratch or even Hopscotch on the iPad to Espresso.

Raspberry Pi – CamJam EduKit (part 2)

After the success of my first post, thanks to Raspberry Pi tweeting about it, I thought I should move on to the other three worksheets that come with this pack (there are another two in the process of being made). I’m really pleased with the feedback I’ve received and I’m really looking forward to seeing the new improved sheets that Tim Richardson is hoping to create using some of the things I said in my blog – another reason why these are such a great resources, the developers are willing to listen to feedback and use it to improve their work! Thanks guys.

So, the next three sheets are entitled: User Input, Button and Buzzer. I’m curious to see what exciting things I’m going to create this time round!!

The first thing I need to do is rebuild my LED circuit from sheets two and three (my bad for dismantling it after the last blog – stupid need to tidy things neatly away) – now that I feel a bit more comfortable with the bread board etc this should be a bit easier!

Circuit built from memory, I was about to plug it in then remembered my own warning from the end of the previous blog and carefully checked that I hadn’t made a silly mistake (once again I’m so grateful for my PiBow Coupe case with the pin numbers all marked up for me). I turned on the pi and thought it was well worth checking my circuit was set up correctly by running the blink programme I’d made in sheet 3 – it took me three attempts to remember how to access the directory where the programme was stored (cd EduKit was the code I needed), but eventually I got my LEDs flashing and was ready to move on to my new task. It was only after I opened up the worksheet to get to work that I realised that the first line of code on the worksheet helpfully guides you to the right directory – well done me!!

So, once again we’re jumping up in the difficulty scale with significantly harder lines of code here. On the one hand the user could quite conceivably copy the code and get the results without any understanding, but the joy of these worksheets is that they do explain what many of the lines of code mean so that people like myself with little or no knowledge can begin to understand what we’re actually doing.

Most of the code that we’ve seen before is explained with hashtags as in the previous sheet, but some of the more complex code is not fully explained and instead is simply summarised – I think I would have preferred having the option to understand more layers of the code, for example that if you put

print "words are here" 

whatever is enclosed in the speech marks is printed to the screen on running the programme, however, I appreciate that the CamJam guys are trying not to overcomplicate things – perhaps a sort of glossary of new code terms could feature at the end of the page for the geeks like me who want to go deeper? The same is true of lines that involve == and of course > which I understand as a maths teacher, but sadly there are plenty of teachers out there who may not understand is meant by the less than, greater than signs!

Overall though, this is another great worksheet and I had fun trying out the different combinations. I had two debugging problems this time around, the first being that for the green LED I’d managed to type ++ instead of == which meant it kept only selecting the green LED and the second was a sneaky space bar which slipped into one line of code before a bracket meaning that the LED just flashed once and ignored the count command. I also nearly forgot the final line of the code to clean up the GPIO pins, but I remembered in the earlier sheet that this was stressed as important so I quickly tweaked my code to include that line.

This time the sheet finished with “do not disassemble this circuit” so I was ready for worksheet 4 and my button.

As with worksheet 2, we are once again introduced to the new components (the button and the ‘other’ resistor in the pack). I’m afraid I couldn’t quite get my head around the concept of a ‘pull-up resistor” from reading about it on the sheet, but I’m hoping this will make more sense once I’ve built the circuit, or else it won’t be something that I need to understand in detail.

As soon as I began to construct the circuit it became more clear – in the previous circuit, the resistor sat between the ground and the LED making part of the completed circuit, this time my circuit goes ‘live’, resistor, GPIO input, button, ground with the resistor sitting neatly between the live input and the button itself. I think I know how it works now.

At this point I’ve realised I have yet to discuss the different types of pins on the Raspberry Pi, so a quick run through – there are 3 main types of pins: live, ground and GPIO. if you connect a circuit from live to ground with an LED in the middle, you will have a lit LED – the live does not work based on any input from the Pi, it is ‘always on’. Live pins can be either 3.3v or 5v. Every circuit needs to be connect to a ground pin, which is what makes bread boards so useful, you can utilise one row to take all of the ground connections, however, there are several grounds on the Pi to make things easier. Finally you have the controllable GPIO (general purpose input/output) pins which can be numbered in one of several ways, but the most common is BCM numbering and this is what is marked on my case. The key thing to remember is that every circuit must end at a ground.

Anyway, back to my circuit, which now has a nice, shiny button installed

IMG_5097

It’s almost as though the creators of the sheet read my mind as this time all of the new commands ARE explained in a box at the end – fantastic!!

This was a fairly easy sheet to work through and this time I only made two minor mistakes (I accidentally put a capital P for print and I forgot my semicolon after the else command). What I’m really appreciating is that in the terminal box the common commands helpfully colour in if you’ve spelt them correctly so if I type print it becomes a lovely turquoise colour and if I remember to put speech marks either side of my printed messages then they go a lovely green colour, it’s great for debugging and makes the lines of endless code look a little bit more interesting.

On this page I also really like the simple end paragraph along the lines of “this will keep going until you press ctrl + c” because I think I probably would have panicked without that instruction. So sheet 5 is getting a massive thumbs up and I’m pleased that my button does something (even if that is just to print “Button Pressed and 0” to the screen).

No instruction to keep the circuit, but I’m not taking any risks as we move onto the final sheet, the buzzer.

IMG_8197

I almost feel a bit sad that I have used everything from my tin to create the final piece of my circuit – this time the worksheet begins by explaining what a function is and how you go about defining and calling one, which is fantastic. This is something I’ve sort of got my head around from Codecademy, but seeing it explained another way has helped to consolidate my understanding! My final task then, is to programme the buzzer to beep out “SOS” in morse code and repeat it a user defined number of turns.

So, once again another successful and easy sheet to follow – I’m really beginning to enjoy myself and sad that I’ve run out of sheets. My mistakes this time were really silly – in my haste to finish I missed out an entire function so when I tried to run my programme it told me that ‘wordSpace’ was not defined. There is a great little extension task on the end of this sheet so that after you’ve made the buzzer beep out SOS you can think about the code for making it do more letters. My gut reaction is that I now want to be able to use the button to make the buzzer go off and I’m already trying to think about how I would programme that so these sheets have really got me thinking, but more importantly, they’ve really helped me to understand python through practical application and I’m feeling a real sense of achievement.

Once again, a great resources from CamJam and well worth the investment in the EduKit tin – I’m really looking forward to letting my Year 5 and 6 Code Club have a go at working through them all and seeing what their reactions are.

Raspberry Pi – CamJam EduKit (part 1)

As I have mentioned somewhere in a previous post, the Raspberry Pi community is very friendly and eager to help people. One of the most proactive groups I have come across is a meetup group in Cambridge called CamJam*. One of the organisers of CamJam, Michael Horne, mentioned something on twitter the other day which caught my eye. He was talking about the CamJam EduKit, which he had helped develop with the PiHut in order to provide teachers with everything they need to get started with the Pi.

*Raspberry Pi meet ups are held all over the country and referred to as Raspberry Jams, but I have yet to find one near me in London (I’ve only seen information about the Cambridge and Manchester Jams so far, but maybe I’m looking in the wrong place). The Cambridge one seems to be a really friendly event and I would love to live close enough to pop by.

There are two things which appeal to me about the CamJam EduKit, firstly they’ve really thought things through and have also created a bunch of basic worksheets, which can be found here and secondly, it only costs £5 plus p&p (which was £2 when I bought my kit).

So, what’s inside the kit:

IMG_5080It’s a useful little kit – you get 3 LEDs (light emitting diodes if you want to get fancy), a simple switch (mine came in two parts, but I’m not sure if this is normal – you simply push the red bit onto the base to make a working switch), some resistors (according to the data sheet, 3 are 330 ohm and a is 4.7k ohm, sadly, at this point in time, this doesn’t mean a great deal t0 me), a small bread board, a buzzer and some wires.

Since owning a Raspberry Pi, I’ve learnt a lot about jumper cables, but the simple fact is, if it’s a sticky out end, it’s male, if it’s a hole to slot something in, it’s female. You can have male to male, male to female and female to female cables; the female end plugs onto the GPIO pins of a pi, the male ends slot nicely into bread boards, but realistically you’ll need a selection of wires for most experiments so it’s great that this kit gives you several male to female along with a couple of male to males AND they’re conveniently colour coded. I would, however, recommend taking a look on ebay or amazon as I picked up a pack of 20 or so of each type for a couple of pounds – I’d also like to mention that when I first got a Raspberry Pi, I naively went to Maplin and asked the young man at the desk if he could help me find some female to female jumper cables…he looked at me blankly and wondered around pointing out a variety of different cables before giving up, so when you’re talking about jumper cables, don’t expect other people to know what you mean!!

So, the first of the CamJam sheets is a very simple ‘setup and go’ activity – the traditional first thing to do with code is get the computer to print back “Hello World!” and so, of course, this is the first thing that the CamJam sheet has us do.

Screen Shot 2014-08-08 at 20.03.43 Screen Shot 2014-08-08 at 20.03.57 Screen Shot 2014-08-08 at 20.04.04

I like the layout of these sheets – it’s very clear what you are expected to do, but how easy is it to actually apply the instructions?

The first thing to point out is that page one is all about the set up for a B model pi, so if you have a B+ your setup will be different – I have been told the revised version for B+ is coming soon. The second page takes you through logging into the pi and loading up LXTerminal, which is great information for beginners and then the actual code itself is explained very well.

So, I followed the instructions through from start to finish and everything has worked as planned, my only problem – I’m now stuck in terminal inside the EduKit directory and I have no idea how to get out of it, however, a quick bit of experimentation has allowed me to discover that I can get back to the home directory by typing in cd ~ again – hooray!

Time to take a look at sheet two and see how we get along – we’re moving straight onto the tricky stuff here with both LEDs, resistors and a bread board (which I still know nothing about).

The first few pages of this sheet are a helpful guide to the components – I’m beginning to think that this kit is aimed at KS3 children, but it’s helping me and I think the more able KS2 children would really enjoy learning some practical applications of the python they’ve been learning in Codecademy.

So, the first thing I needed to do was turn off the pi and build my circuit – the worksheet doesn’t guide you through shutting down, but luckily I knew to type ‘sudo halt’ into my LXTerminal window. I’m not going to lie, this was the first time I’ve used a bread board properly and I felt a massive sense of achievement once I’d slotted in all the bits. I originally had problems getting things to stay in place until my other half pointed out that I needed to really push the resistors into place and not just slot them in loosely.

IMG_8981Achievement unlocked, it was now time to start typing some code and I fell into my first foolish mistake while trying to access my EduKit directory. It’s so important to remember in Python that case matters so my first attempt to access the directory lead to a “No such file error” because I’d forgotten the capital K for EduKit. An easy, but common mistake.

What I particularly like about this worksheet is that after you’ve typed in the lines of code, they are explained below so that you have an idea of what you are doing.

My only problem was that I had made two mistakes in my code – firstly I’d written a full stop instead of a comma in one line of code and secondly I’d written ‘LOW’ as lowercase by mistake and I had to figure out how to access my code to edit it and the sheet doesn’t explain what to do – luckily I figured out that you just need to retype the nano command again to access it.

Anyway, so far the first two sheets have been really easy to follow so let’s finish off this post by taking a look at sheet three since it immediately follows this one.

The third sheet in this series simply walks you through typing the code to make the LEDs blink – this time there are a lot of hashtags in the code, which means notes from the writer rather than relevant lines of code so I obviously didn’t type them into my terminal, but these stood as simple, useful reminders of what different commands meant. The explanation for this code is therefore embedded in the code rather than as a box at the end – I like this because it feels like progression from the first two sheets where everything is explained separately.

It was during the debugging stage (I’d randomly put a full stop in the middle of the first line of code), that I remembered that by pressing the up arrow you can get the terminal to repeat a previous sentence so instead of constantly typing in “sudo python 3-blink.py” I could just press the up arrow a couple of times and it appeared for me – useful thing to know!

Anyway, while I feel the electronics setup may be tough for some of the less able KS2 children, these are a fantastic set of sheets for use with upper KS2 and certainly with KS3 and I’ve been really impressed with the ease of use and the attention to detail. For the beginner, this is a really useful tool and I would definitely recommend taking a look and purchasing a kit yourself.

If you are planning on handing these worksheets and kits to children to work from, I would emphasize the importance of knowing which GPIO pins are ground, and live and probably encourage them to check with an adult before booting up in order to avoid damaging/destroying the Pi (which can be done with an incorrect setup!). The lovely PiBow Coupe case that I bought from Pimoroni helpfully has all of the pins labelled to avoid confusion and for the B model Pis you can print out something called a Raspberry Leaf which is a simple guide to the pins (I’m sure there will be one for the B+ available soon). Someone on my course actually had a little keyring Raspberry Leaf made from an old circuit board which slotted over the pins, which I thought was pretty cool. Anyway, it’s definitely worth checking that you have your circuit set up correctly as GPIO to ground and not live to GPIO or something equally destructive!

So the conclusion is that these are a great free set of sheets, especially for beginners and the really cheap kit has everything I’ve needed so far to complete the tasks and feel a smug sense of self achievement. Thanks CamJam and PiHut – keep up the good work!


Quest – Text-based adventure game (creating a game)

For an introduction to Quest/ActiveLit, click here. For information about creating your first room, click here.

So, after creating my single room and getting my head around how to use this software, I’ve made a start in creating my full game from the map I created earlier:

IMG_5051

As a starting point, I created every single room, which meant I had to give them all names. I would suggest that the rooms are named during the planning phase.

Once I’d created all of my rooms, I could then add in all of the entrances – I know in my final game that I want some of the doors to be locked and/or hidden, but for now I just want to get them all in place – fortunately there is a tick box as part of the ‘exit’ creation tab, which allows you to make your exits two-way, meaning you don’t have to create them twice (once for each room).

Screen Shot 2014-07-31 at 16.51.26

So, my next step is to hide/lock some of my doors.

Screen Shot 2014-07-31 at 16.57.39

And now I can start populating the rooms with objects.

I’m not going to go into too much detail, but my game creation took approximately 3 hours and then I had to ask a friend to beta test it, at which point several problems were identified. I’m happy for people who aren’t sure to drop me an email, but I also found the creator of text adventures, Alex Warren, on twitter and he seems very happy to help and get involved.

So here’s how my populated game looked after creation:

Screen Shot 2014-08-08 at 19.29.40

And here’s a copy of a few bits of the log from my friend playing through, which helped me to make some changes.

Screen Shot 2014-08-08 at 19.30.41

One thing this highlighted to me was the importance of creating an object and a description for every single noun in the room. My room description mentioned a computer, but I hadn’t created an object called computer and this led to my friend getting very, very frustrated.

I also found that it was important to add extra verbs to word – in one room I wanted to have a picture which you could push to one side to reveal a switch, I discovered two things: Firstly, you need to drop a REALLY big hint in the description that the object can be moved and secondly, that you need to think about the different verbs that people might think of to describe pushing or moving or shoving a picture out of the way. I decided to make the object a container AND edit the verb field like so:

Screen Shot 2014-08-08 at 19.33.52

Hopefully, like me, you’re currently bouncing up and down about the cross curricular links between this particular programme and English/literacy. Not only do the children need to plan their story carefully thinking about how events link into one another, they also need to think carefully about nouns and verbs. They need to know what a noun is in order to understand that every single object in your room is a noun and therefore needs to be created as an object and given a description!

When a pupil finishes their game it can be ‘published’, but this only make it available to other users in the group, making it a safe environment to make mistakes and a great way to help each other think about errors. It would also be an ideal opportunity to discuss debugging as each user tests one another’s games.

My final word on this is that I think it will be tough to teach, I think it will be hard work to explain all the nuances to the children and probably require a lot of running around, but I also think it has so many positives that it would be an invaluable classroom tool as long as you take the time to understand how it works.

If you want to play my game, click here and for now, I’m off to plan my next game!!