We’ve been using Espresso in my school for a number of years for subjects like history and English. I’m sure most schools have one of their servers installed somewhere in a forgotten corner. As a maths and ICT teacher, I’ve never really found much use for it, but occasionally I’ve given it a cursory glance. Earlier this year we were sent information about a free trial of Espresso Coding, which I decided to take a look at with my Year 3 and 4 children in order to introduce some of the concepts of code and to see if it’s any good. We’ve been using it in the classroom since January 2014. Espresso have said that they will start charging from October 31st 2014 (I can’t seem to find the price so far). It seems to operate completely online and be managed separately from the main bulk of Espresso (which requires you hosting a server within your school that they manage externally), however, this may change once they start charging. I’d be interested to see what they charge since Scratch and Scratch Jr are comparable products, but are both completely free.
So, what do you get for your money? Espresso have created 2 units of work for year groups 1-6 and in each unit they aim to teach a develop various different coding skills. They’ve also introduced a ‘starter unit’ so that you can recap the information from previous years without going all the way back to the beginning of Espresso Coding.

Each unit is broken down into 6 lessons and each lesson also has 6 parts to it, which does make the software fairly idiot-proof, however, it does mean that there is an awful lot of repetition. Your more capable children could quite easily jump straight to Step 6 of a lesson and find no difficulty with the task.
 Each activity is introduced with a simple video explaining what you need to do and how you need to drag your blocks into place to achieve the expected outcome. This means that Espresso Coding is really good for those teachers who are less confident with coding and the language of coding.
After watching the video you are taken to your ‘game’ in the My Design tab – here is the start screen for Unit 4a -> Lesson 5 -> Healthy Eating (lesson 6 is always a ‘design your own game’ option using the new skills you have just learnt).

This basically shows you the four images you can animate – in Scratch any image that you can manipulate and get to move is referred to as a sprite, which is the term I now tend to use to differentiate between something that moves and something that is in the background so that when children move on to Scratch they understand the term.
While you are creating your code, you can get back to the game screen by clicking on the “My Design Tab” and to play your game, you need to hit “Run”.
So, when you enter the My Code tab you have a selection of control bars and a load of pictures that you can drag into place to write your code:


By dragging the blocks into place you should end up with something like this:
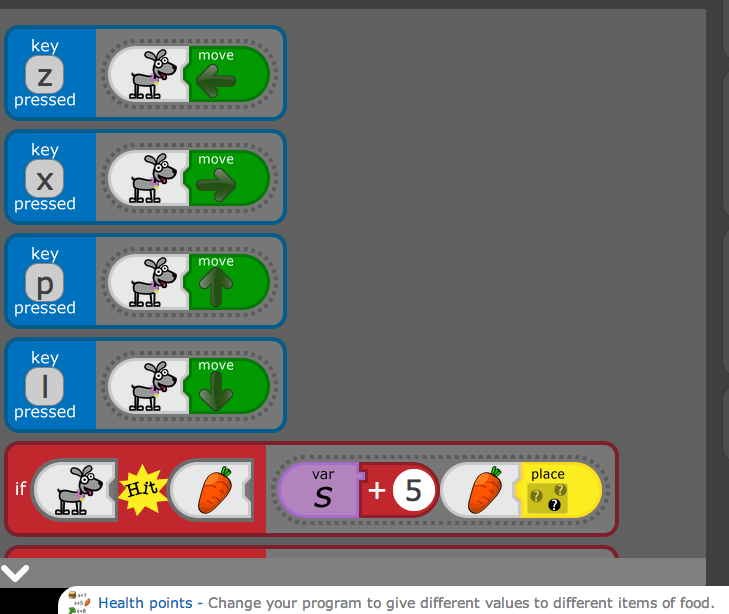

Let’s take the very bottom line of ‘code’; if I were to read that to the children I would read it as “If dog hits burger, burger gets randomly placed somewhere new and score goes up by -10”. As you can see, it’s all very simple and self explanatory.
You can see how strange it would look if I put the blocks the wrong way round – the sprite (or noun, or object or whatever you want to call it) must come before the instruction – it’s a bit like writing a sentence in literacy (cross curricular, cross curricular!!!!)

The whole code basically makes the dog move in straight lines constantly in whatever direction key you press (I tend to subtly hint that WASD is a great key combination, but that’s because I’m a big geek). When the dog hits one of the items of food the score, or variable, either goes up or down and then the food item randomly relocates.
So, what I’ve found is that the children really enjoy using Espresso Coding – probably because they can’t really go wrong so it’s nice and safe. They really like the big cartoon-like characters and the simple instructions, however, I found that after a while they began to get a bit bored with being constrained to one skill per unit. They started to skip lessons out and jump straight to either lesson 5 or the ‘create your own game’ section and just have a play. In particular the boys were really eager to move on and so I tended to use Espresso as a starting point for coding, but once they children were more comfortable I moved them on to the Scratch cards (more info here) and even onto the Code Club resources because that allowed them more opportunities to be independent learners.
Espresso have worked hard to try to make their resource cross curricular and have even got a few lessons designed to work on a iPad and have a good awareness that many KS1 and 2 teachers really don’t have a clue about coding, however, it is a limited application that can get a bit tedious and works best as a way to introduce skills before moving on to more complicated resources.
I would recommend Espresso Coding as a useful stepping stone, although that does depend entirely on how much they plan on charging for the product. Personally, I haven’t renewed my contract for Espresso Coding because, while you are teaching children coding concepts, there is no independence or opportunity to really use the coding skills. It is a little bit too much of a ‘paint by numbers’ approach to teaching coding and I prefer using Scratch or even Hopscotch on the iPad to Espresso.
