So, once again I need to admit my ignorance…
A few weeks ago, my friend borrowed my SD card ‘to take an image’ and somehow corrupted it – I don’t know how and neither does he, but he did managed to back up all my files. So, I’ve not used my home Pi for a while because when I tried to follow the instructions to reinstall Raspbian, I got very confused and had a few failure methods on the way so I figured it was time I wrote a real, back to basics, idiots guide to installing Raspbian (by idiots, I mean me by the way).
So to start off, there are various different operating systems you can install on a Raspberry Pi – the most basic one is Noobs, which is the recommended OS for the Pi, however, I’d recommend going straight for Raspbian since it’s unlikely, as a beginner, that you’d want to use linux etc.
Download Raspbian from the Rapberry Pi website here. There are some instructions on this page for installing Raspbian, but I got in a bit of a muddle so let’s go even simpler. I’m a user of torrents so I used this method to download, but as long as you know where the file has gone, you’ll be fine (hopefully it has gone to your Downloads folder).
I’m currently using OSX Yosemite (10.10.3) so here’s how I managed to install Raspbian:
Firstly, I plugged my SD card into the reader on my MBA – You need to find the identity of the disk and you can do that through disk utility or through ‘about this mac’ – here’s a picture guide to this method:
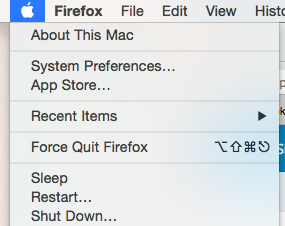 First, click on ‘about this mac’, then ‘system report’:
 Finally, select ‘card reader’ to get information about the disk – you will see that mine says “BSD name: disk3” so, very simply, my SD card is disk3.
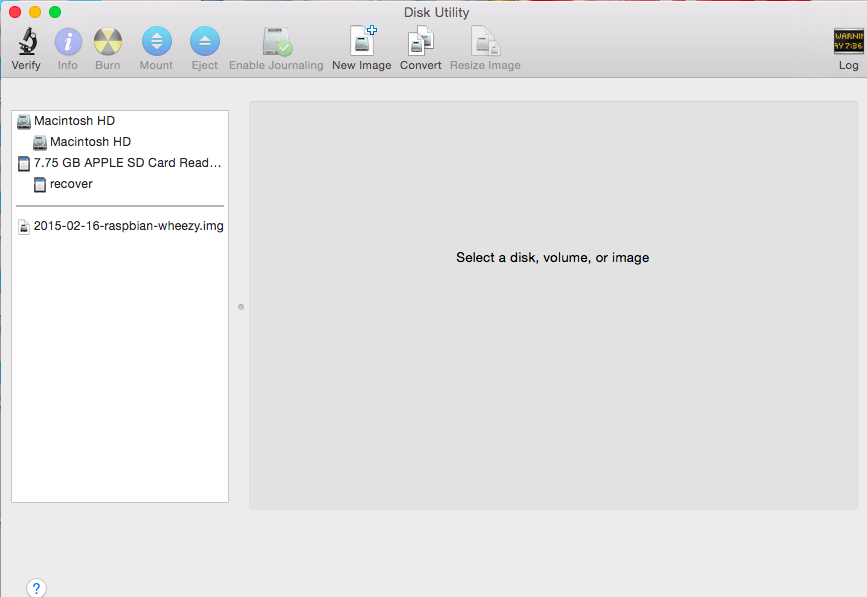
 The next step is to open disk utility which can be found in utilites (accessed by typing in shift +⌘ + u):
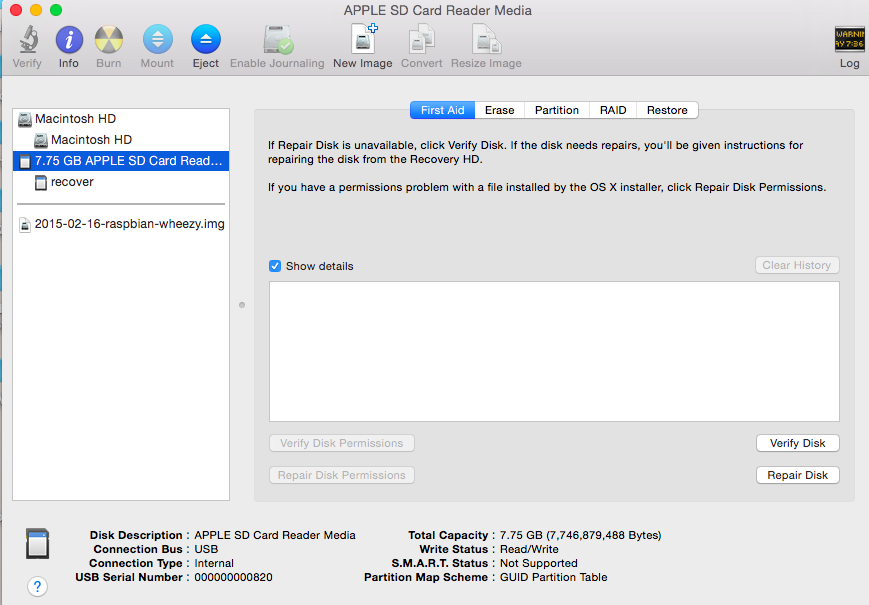
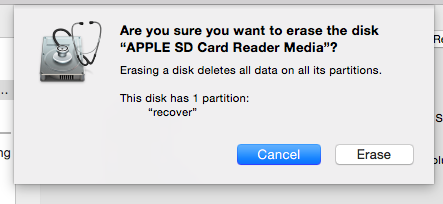
Select your SD card – and choose the ‘Erase’ tab – *Warning* *Warning* *Warning* make sure you have selected the right disk to erase – double and triple check that you have your SD card.

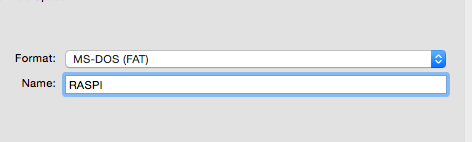
Make sure you select Format: MS-DOS (FAT)

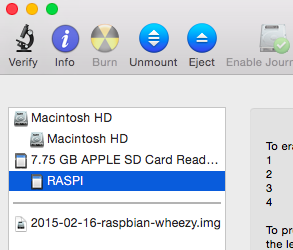
Finally, select your SD card and unmount it (not eject!):

You’re now ready for a bit of terminal!
When I opened up terminal (in utilities again), I was instantly placed into ‘my’ folder meaning the home directory for my user account (myname) – shown in this picture with a little house symbol.
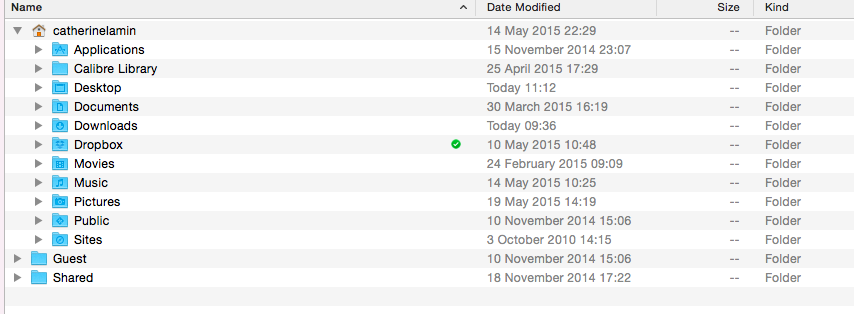 So terminal has automatically opened the ‘myname’ home directory.
 This is where I hit on a real problem – the Raspberry Pi site suggests typing this into terminal:
- From the terminal run:
sudo dd bs=1m if=path_of_your_image.img of=/dev/disknRemember to replace
nwith the number that you noted before!
But, I didn’t know the path of my image! I knew it was in my Downloads folder, but I wasn’t sure how to access it – after an awful lot of trial and error I figured it out!
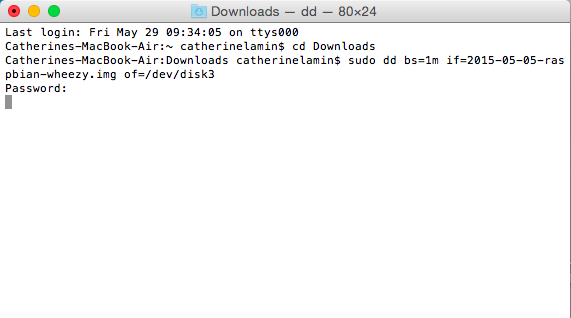
I was already at the home directory, so I needed to drop into downloads by typing cd Downloads into terminal then I could easily run the code – you’ll notice I changed the ‘diskn’ at the end to ‘disk3’ based on the BSD name I found right at the beginning.
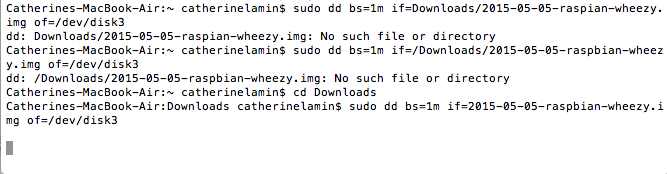 So, my final code looked like this:
Catherines-MacBook-Air:~ catherinelamin$ cd Downloads
Catherines-MacBook-Air:Downloads catherinelamin$ sudo dd bs=1m if=2015-05-05-raspbian-wheezy.img of=/dev/disk3
I was prompted to input my password and then terminal started writing my disk – until terminal finishes the task, I can’t do anything.
So when it’s all done and the terminal looks like this:

You can eject your SD card and plug it into the Pi.
Not long after I finished this, I was told by the lovely James of Raspberry Jam Berlin that you can write the image even quicker by using “rdisk3” instead of just “disk3” at the end of the code which should speed things up.

Raspbian IS Linux!!!!!!!!!!!!!!!!!!!!!
LikeLike
You’re right, my bad – I wasn’t paying attention to what I was typing – I meant UBUNTU or RISC OS. I’m just an ignorant teacher flailing about in the dark 😉
LikeLike
Wait… hang on. You’re actually installing Raspbian on a RPi… with a Mac. Took me a while, thought I was in for some hacking treat of forcing a Mac to install Linux but no. Oh.
LikeLike
That would be cool, wouldn’t it. Alas, my blog is aimed at teachers like me with poor technical knowledge, but lots of enthusiasm who want to get Pis up and running in their classroom. Thanks for stopping by though 🙂
LikeLike
I followed the instructions but I had 4 files to erase and not 1 under partition. Please advise
LikeLike
You have four partitions on your memory card already? If you definitely have your SD card selected then you should be fine to erase all. Can you screenshot and email me?
LikeLike